Tuesday, January 31, 2017

Video tutorial: How to photograph your scale models and dioramas

There's nothing worse than a shabbily photographed model. Tens or hundreds of hours put into the build, and then a couple of half-arsed blurry smartphone photos of it in front of the toaster crumbs on the kitchen bench. Not good enough.


Once you've finished building and painting your pride and joy, you want to photograph it. Partly to document what you've done, and partly to share it with friends and other modellers online.

In this video I show you how I photograph my completed models. I don't go into details of complicated camera settings (focus, exposure, blah blah blah...). Rather, I show you how I work with natural light and an appropriate backdrop to really hero out your completed model and make it stand out.

If you have suggestions on how you shoot your models, do please let me know in the comments. I'd love to hear how other people do this, and see examples of your photography.

Until next time.

Cheers,

Dave

Monday, January 30, 2017

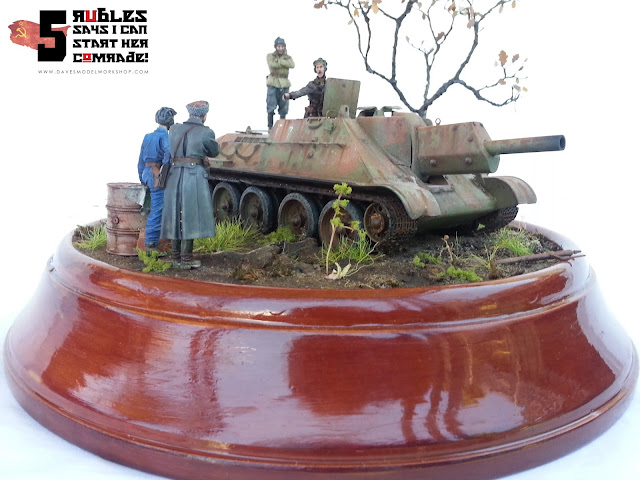
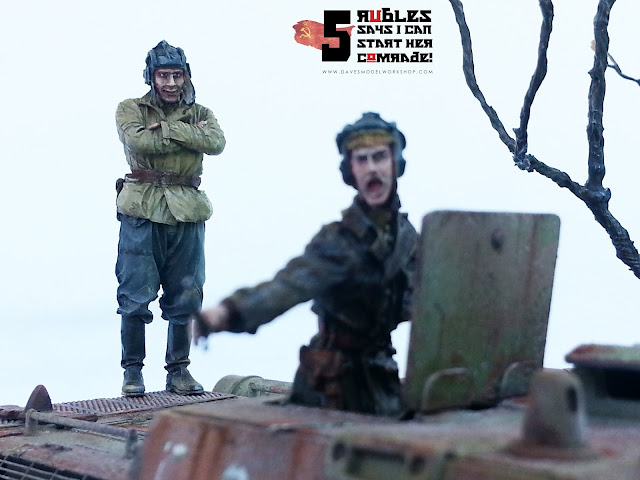
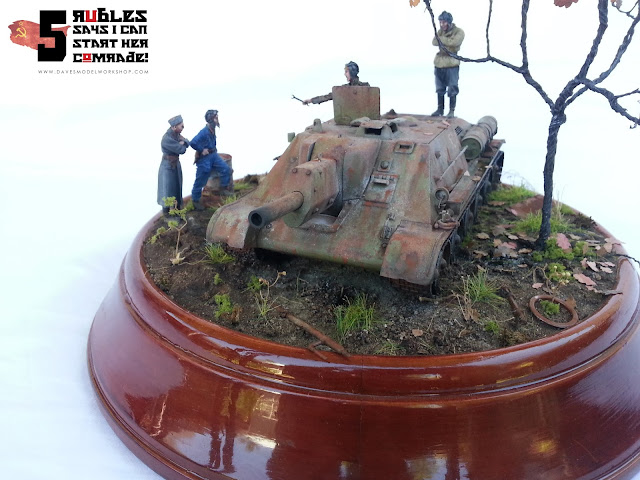
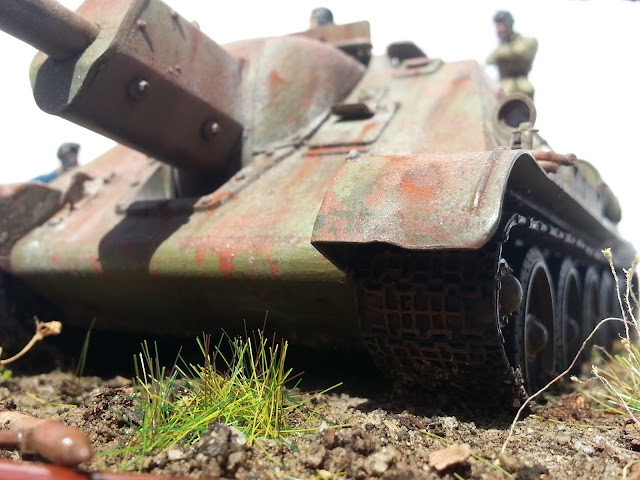
Soviet SU-122 diorama - still photographs

There may be those who may not want to sit through yesterday's video showcasing my latest diorama (c'mon, it's under 3 minutes!). "Video", they say, "is not the best way to see the details! I need still photography, and it better be close-up shots, dammit!"


Sheesh. What cantankerous model nerds!

But I do want an excuse to feature photos of my build. So here they are.

As always, if you have any questions or comments, or if there is anything in my diorama you'd like to see in greater detail, just comment below.

Cheers,

Dave

Russian Soviet WW2 tank SU-122 diorama - 5 rubles says I can start her comrade!

Russian Soviet WW2 tank SU-122 diorama - 5 rubles says I can start her comrade!


Russian Soviet WW2 tank SU-122 diorama - 5 rubles says I can start her comrade!

Russian Soviet WW2 tank SU-122 diorama - 5 rubles says I can start her comrade!

Russian Soviet WW2 tank SU-122 diorama - 5 rubles says I can start her comrade!

Russian Soviet WW2 tank SU-122 diorama - 5 rubles says I can start her comrade!

Russian Soviet WW2 tank SU-122 diorama - 5 rubles says I can start her comrade!

Russian Soviet WW2 tank SU-122 diorama - 5 rubles says I can start her comrade!

Russian Soviet WW2 tank SU-122 diorama - 5 rubles says I can start her comrade!

Russian Soviet WW2 tank SU-122 diorama - 5 rubles says I can start her comrade!

Russian Soviet WW2 tank SU-122 diorama - 5 rubles says I can start her comrade!


Russian Soviet WW2 tank SU-122 diorama - 5 rubles says I can start her comrade!
Do they look suitably skeptical?
Russian Soviet WW2 tank SU-122 diorama - 5 rubles says I can start her comrade!

Russian Soviet WW2 tank SU-122 diorama - 5 rubles says I can start her comrade!

Russian Soviet WW2 tank SU-122 diorama - 5 rubles says I can start her comrade!

Russian Soviet WW2 tank SU-122 diorama - 5 rubles says I can start her comrade!

Russian Soviet WW2 tank SU-122 diorama - 5 rubles says I can start her comrade!


Sunday, January 29, 2017

Soviet SU-122 diorama video: "5 rubles says I can start her Comrade!"

Here is the long awaited (well, long awaited by me at least) completed showcase video of my WW2 Russian tank diorama. I've entitled it:
"5 rubles says I can start her Comrade!"


Ukraine, Autumn 1947:
A group of Soviet mechanics and tank crew discover an abandoned SU-122 assault gun...


The tank is the old Tamiya SU-122 kit, first released in 1976.

The crew are a mix of Evolution Miniatures and Mig Productions resin figures.

I hope you like it - I certainly enjoyed building it.

Cheers,

Dave

Saturday, January 28, 2017

My SU-122 Soviet tank diorama is finished!

I've been working on this for a few months now, and my SU-122 Soviet tank diorama is finally complete.


I'll be making a showcase video in the next day or so, but I wanted to share a couple of teaser shots now to whet your appetite.

Set in the Ukraine in 1947 where a group of Soviet mechanics and tank troops have discovered an abandoned SU-122 assault gun, the title of the diorama is "5 rubles says I can start her comrade!"

Keep an eye out for the video.

Cheers,

Dave


SU-122 Soviet tank diorama: 5 rubles says I can start her comrade!


SU-122 Soviet tank diorama: 5 rubles says I can start her comrade!
Soviet mechanic's toolbox.

SU-122 Soviet tank diorama: 5 rubles says I can start her comrade!
Even rusted out, an SU-122 is imposing.

SU-122 Soviet tank diorama: 5 rubles says I can start her comrade!
Gotta love a dirty and abandoned tank diorama.


Thursday, January 26, 2017

Happy Australia Day

I'm an Australian, if you hadn't already picked that up from my accent in my YouTube videos.  And today, January 26th, is Australia Day. So I wanted to share with you my Australian models.


But you know what? When I thought about it, I don't have a single model of an Australian subject.

Isn't that terrible?

The closest I have is a model that I made in about 1989. It is the venerable Tamiya LRDG 30cwt Chevrolet Truck, painted to represent a New Zealand vehicle with a Kiwi on the front and the Maori word "Te Taniwha".  New Zealanders are pretty much Aussies (and every Kiwi reading that is now utterly outraged).

Pfft, call myself an Australian...

The model itself is a pleasure to build, I remember, and it still has functioning steering. The back tailgate still works too.  What a beautifully engineered kit from Tamiya, especially when you consider it was first released in 1976. My building and painting of it don't bear close scrutiny in 2017 though!  To be fair, I was about 15 when I built this, and I remember being immensely proud of it as my best model so far back then.  I look at it now, and all I see are untrimmed mould seams, sloppy paintwork, and messy globs of glue!!! Look at the camouflage tunic on the driver - ghastly.  But it is nice to still have that little time machine, to be able to see how far you have come and to realise how much joy the hobby has given you over the years.

Anyway, happy Australia Day people. Get out there, enjoy a beer and think of Oz.

Cheers,

Dave

1/35 model Tamiya LRDG Chevrolet truck
Front bumper missing in action after 30 years.

1/35 model Tamiya LRDG Chevrolet truck
The driver figure and posable front wheels still give a great sense of motion even now.

1/35 model Tamiya LRDG Chevrolet truck
I remember trying to weather this with REAL dirt and mud. You can still see it on the wheels!

1/35 model Tamiya LRDG Chevrolet truck
Oooh, that's some sloppy camouflage on the driver...


Wednesday, January 25, 2017

Video tutorial: What tools will I need to start making models? - Scale model basics


Starting out making models, it can seem a little daunting. What tools will I need to start making model kits? There are so many out there! How much will this cost me?


Plus you get experienced model makers bragging about their latest, fanciest and rather pricey tools (ahem, guilty your Honour...). Do I need an airbrush starting out?  A full set of files? Microdrills? A Dremel motor tool? A soldering iron? Specialised cutters? This is expensive!

Fear not, new modeller! You don't need all that stuff to begin making model kits.  Honestly, all you need are my Top Ten tools for people starting out in the hobby. They are all fairly inexpensive. In fact, you will have some of these already sitting around your house, I guarantee it. For a modest outlay you'll be set to build and paint whatever model kit you want: tanks, planes, cars, dioramas, figures, ships - whatever kit it is that has tempted you into this hobby.

Once you've built up some confidence and are sure you want to keep building scale model kits, them you can start to explore and invest in some of the more esoteric equipment. Some of the expensive stuff will save you time and give you better results once your skills have surpassed the basic tools. Some of the expensive stuff is just fun to work with and own. (Personally, I'd count an airbrush as #1 in this category - once you use one you'll never want to not have one, but you don't want to shell out hundreds of bucks while you're still finding your feet).

But in the meantime, you'll have covered the scale model basics, and I promise you will continue to keep using these tools in the Top Ten for many, many years. I've been using one of my Top Ten tools for about 30 years now without ever upgrading. Not a bad return on investment there.

Have I missed an essential tool for beginners?

If you think I have, please comment below! Let me know number 12, 13, 14 - however many you've got. I'm sure it will help others, and I may even learn something too!

Cheers,

Dave


Saturday, January 21, 2017

Video tutorial: Make a diorama Static Grass Applicator for under 10 dollars

You don't want to have to spend big money to effectively apply static grass to your dioramas.


Static grass is essential in many dioramas, but it's very hard to make it stand upright without an applicator, and many commercially-available applicators are very expensive. In this video I'll show you how to make your own for under ten bucks.

All you'll need is an electric bug-swatter, a small sieve, and a nail. That's it!  I've even added links below to purchase these from Amazon - it doesn't get any easier than this.

I promise you don't need to have previous experience wiring electrical items.

Watch the video and tell me this isn't the easiest solution out there.

(Oh, also, keep an eye out for the dramatic moment at 10:53 !)

Cheers,

Dave


I found the cheapest bug zapper available on Amazon for you.  As for the sieve, I reckon you could get one at your local dollar store for under $2, but in case you can't, here's one on Amazon as well so you can get it all in one parcel (although technically it comes in at juuust over 10 bucks - you'll have to supply your own nail)


Wednesday, January 18, 2017

Making my own static grass applicator

I'm doing a little amateur electrical work this evening, and making my own static grass applicator for under $10. Normally these cost up to $180.  Suckers!

Video tutorial will come in the next few days.

Cheers,

Dave

It involved a soldering iron and everything! Wooo, grown-up tools!

Pfft! Only suckers pay these kind of prices.

Monday, January 16, 2017

Getting kids into model making

How do you get kids interested in making models?


I'm a dad. I've got a four year old daughter. And I want to share my hobby with her.

Partly it's so I can spend time with her and show her what I love about model making. Partly it's so she can (hopefully) develop a hobby or interest that is real-world, away from digital screens. Mostly it's because when I was a kid this hobby gave me a huge amount of pleasure, and I hope she can experience that too.

If she doesn't grow up to be a model-maker, then that's okay too.  But while she's young, she can have some time with her dad doing a daggy creative hobby.

I won't say I have all the answers on how to get your kids interested in models, but I will say it's good to involve them from a young age and share their creativity. Rivet counting be damned!

So this weekend just gone we made a squadron of biplanes out of some old toilet paper rolls and some spare cardboard.  Cut them out and glued them with plain old white PVA glue on Saturday afternoon, and then on Sunday when her friend came over we painted them and then had some biplane races.

From little things, big things grow.

Cheers,

Dave

Rough template. Don't overthink it, whatever looks right!

Maybe grown-ups need to be in charge of the scissors.

Looks airworthy.

A squadron worthy of  "Wacky Racers".

Painting! This is where 4 year olds get to enjoy themselves.

You may be able to guess which one I painted...

Ready for racing.

The Red Baron flies again.


Thursday, January 12, 2017

Video tutorial: Make a round diorama base from an old clock

Yet another amazing video on Youtube!  The latest shows how I made a round diorama base using an old clock I picked up at a thrift shop.

Video link: Make a round diorama base from an old clock

I always try to keep my eyes open for everyday things which I can re-purpose for model making. I find this sort of thinking becomes infectious. Once you start, you spot potential model stuff absolutely everywhere. Potential tools, items to use for scratchbuilding, diorama scenery, and (as in this case) ways to display models.

In the video I go over how I stained and polished the wooden base. I then show how I made the plaster groundwork, and how easy it is to achieve realistic texture and colour for the earth in a diorama. Once you’ve done these steps, you’re set: the world is your oyster. Grass, buildings, scenery, trees - add whatever you want!

If you’re curious, I also have videos which cover off early stages of building the SU-122 tank and how I built the hand-made oak tree in this diorama.

Video link: how to make a tree from twisted wire

Video link: early photoetch work on the SU-122 tank

As always, if you have any comments or questions, just let me know!

Until next time, keep experimenting,

Dave


Wednesday, January 11, 2017

The Soviet SU-122 diorama now has a base

My Soviet diorama progresses!


I've been working on my diorama base for my Soviet SU-122. Last night I poured a plaster base onto the wooden plinth (which used to be a cheap broken clock from a thrift shop).

Next step is to seal the dirt on the plaster using white glue, and then get painting the dirt!

A video will be coming soon.

Cheers,

Dave

Trial run to see how it all will fit.

More test fitting.

Ready to mix and pour the plaster of Paris.

The plaster is poured in.

Dirt is sprinkled on the wet plaster to give texture.

The tank is pushed in to give it a realistic sense of weight.
Nothing worse than a tank sitting on top of rocks and bumps with air visible under the tracks!

Positioning of figures and other elements so they also sit realistically.

Monday, January 9, 2017

Resurrecting old models and overcoming "modeller's block"

Over the weekend I had a chance to work on some old models, and it was quite illuminating to see how far I have come as a model maker and what new techniques I have picked up over the last few years.


Back in about 2010-2011 I had plans to build a diorama around the Americans in the Ardennes forest. I built two vehicles, both ancient kits. One was the old 1970s Italeri M4A1 Sherman kit, and the other was a 1960s White M3A1 Scout Car kit from Peerless, a manufacturer who is no longer around.  Both kits have massive faults, but I used photoetch to bring the Sherman at least up to modern standards.


Ancient, ancient kits. I believe the Scout Car was re-issued by Italeri in the 1990s.


Modeller's Block

But then I got cold feet, I couldn't really finalise the diorama in my mind's eye, and I never finished either kit. They were painted to a level which I thought good back then, but large areas were left unfinished - the doors were never attached to the Scout Car, and I never painted or installed the tracks on the Sherman tank. This was because I didn't know exactly how they would work on a diorama - would the door be open because a passenger had just gotten out, or would they be shut in a fire fight? Would the tracks on the tank be muddy, or covered in snow, or just dusty?  I wasn't sure, so I didn't commit. I call this "Modeller's Block", similar to writer's block - what do I do with this partially finished story I am trying to tell?

And now, six or so years later, I am glad that I did leave those decisions unmade, because I can now finish these models and don't have to wrestle with a glued-shut door that I want open!

I have decided to commit to finishing these kits, and installing them in a wintery diorama.

Most importantly, it gives me a chance to assess how far my skills have developed. I had made an attempt to colour-modulate the Sherman, and it certainly serves as a solid foundation to build upon now, but it is pretty boring. And the White Scout Car looks factory fresh, all I had done was a panel line wash and some drybrushed highlights.

So now I am in the process of resurrecting these old models, and trying to turn them into something I can be proud of. It's a little time capsule, and I'm enjoying it immensely. Plus I can get over feeling guilty about those unfinished efforts which have been quietly mocking me from the shelf for years!

I'm making a video of how I update them, and of course when it is ready I will tell you about it here.

Until next time,

Dave

This was how I left them in 2010.  From this...

... to this in one afternoon. All will be revealed in my video!

I'm already pretty happy with that weathering.