Thursday, September 28, 2017

Scratch building rudders and flaps

"Building rudders and flaps." Now that is a sentence I never thought I would utter. But I am busy scratch building the various flying rudders, ailerons, and dangling aerial flaps that will festoon my sci-fi ship.


Here's the general idea of the rudders that will be in place:

Sketch of scratch built sci-fi scale model build


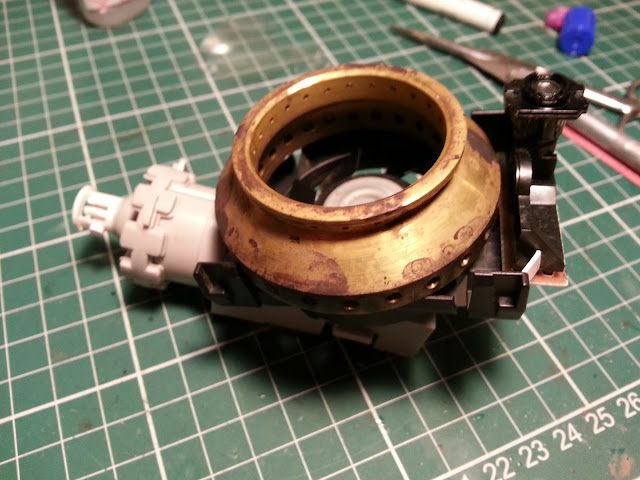
The first one is made out of an old tail aileron from a 1/32 Messeerschmitt Bf109, plus the diff housing from a Russian katyushka launching truck.

scratch built sci-fi scale model build - rudder
Please excuse that manky-looking thumbnail...


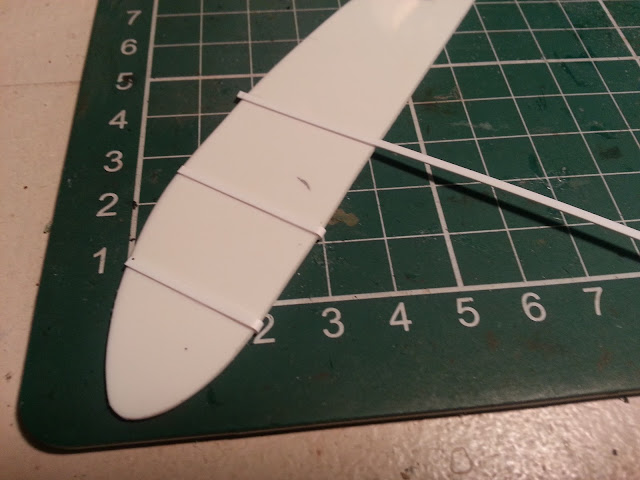
The next, longer one is scratch built, carved out of a piece of styrene card.

scratch built sci-fi scale model build - rudder

scratch built sci-fi scale model build - rudder

scratch built sci-fi scale model build - rudder


Much more to be done, obviously, but I'm loving not having to slavishly follow instructions on this build!!! Tremendously liberating.

Cheers,

Dave

Monday, September 25, 2017

New video: Scale model science-fiction scratchbuild - Part 1

I've uploaded my latest video, which records the early scratch building stages of my new project, the sci-fi anti-gravity ship. In this video, I show you how I scratch build the engine and thruster details, as well as very preliminary work on the hull.


Scale model scratch build science fiction ship


It's very early stages still, there is a loooong way to go, but I'm trying to document the whole build from go to whoa so that you can all see how it progresses and what is typically involved in a scratch built model.

Video is embedded below, but in case that doesn't work here is the link:
Scale model science fiction scratch build - Part 1

Cheers,

Dave


Saturday, September 23, 2017

How many years has it been since you built a scale model? Guest post by Michael McCallin

Today I've got a special guest blog post by Michael McCallin, who recently returned to the hobby of scale modeling after last building models in the 1970s! I'm regularly contacted by people who have come back to the hobby after many years away, sometimes decades. The scale model industry has changed drastically over even the last ten years (hello 3D printing and Chinese kit manufacturers), so I thought it would be fascinating to get Michael's take on what it's like to come back after several decades away from building scale models.


Guest blog post by Michael McCallin:
_________________________________________________

Model kit building today


It has been a few years since I last had a go at building a plastic model - 1976 to be precise, and not doing a very good job at it I must say, wrecking the best that Airfix had to offer, always built far too quickly and with too much glue, one tube one model.

Not much in the way of building technique assistance back then - no fancy mags that I can remember, but wow hasn’t that all changed now we have magazines to suit all types of builders: model Railways, Aircraft, Boats, Plastic kits the choice seems endless in the newsagents.

scale model 1/32 Sopwith Camel
A 1/32 Sopwith Camel that cost $24.99. It takes guts to tackle WWI rigging - Dave


But the biggest change for me has been tuning into YouTube. To me it’s the go-to information network of the world, if it’s not on YouTube it’s not on this earth.

For an old new modeller like me it’s a wealth of free information helping me back into a hobby that I really enjoyed, and hopefully with the help of the presenters making a quality model I can be proud to display.

So after spending lot of time looking through heaps and heaps of YouTube model building videos I decided armed with my new found knowledge it was time to build a kit and put it all into practice.
I have to be honest and say that Dave is my favourite YouTube model builder presenter and every model I have completed has had a bit of Dave’s tips added to it. His hairspray technique springs to the forefront: so easy and so effective, but who would have thought of doing that back in the day, anyhow I think we only had Brylcreem.   
   
So what’s changed in the modelling world for me? Actually it’s a hell of a lot.
Let’s start off with kit choice. I found it hard to make a selection of what I wanted to build and in what scale to build it in. The choice seemed endless.

The kit quality and detail can still vary from maker to maker, but I still got a lot of enjoyment trying to get the better of a $24.99 kit, a Sopwith Camel. Then my look of awe as I opened the box of the Tamiya F15J Eagle $150 still to be completed. Both kit enjoyment level 10!   
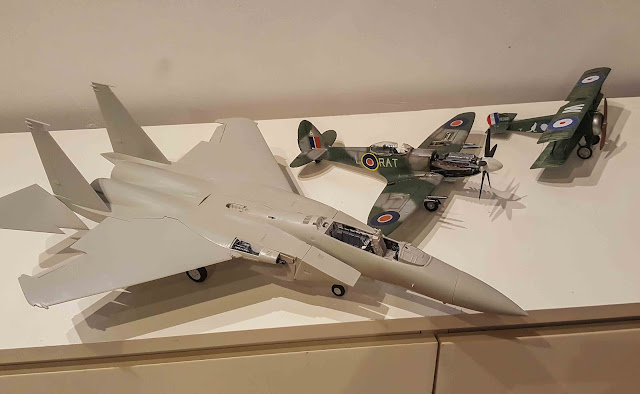
scale model 1/32 fighters: F15 compared to Spitfire compared to Sopwith Camel
I love Michael's curated builds of 1/32 fighters: WWI, WWII, and modern. Look at the size difference!

1/32 scale model of an F15 cockpit
The F15 Eagle cockpit currently in progress.


Glue - I have tried a few now and my favourite has to be the Tamiya super thin glue, that’s just amazing glue. Unlike the old days I reckon I could build 15 models out of one jar.

Paint, wow you don’t get much for your money, but they are so good and the finish when they dry on the model is just perfect, but the most amazing paint has to be Buff paint that is just unbelievable from Mr Metal . That paint instantly turns plastic into metal and looks the coolest thing ever. The engines on the F15 look totally awesome and the paint really helps bring them to life - I just can’t praise the paint enough, for me this product alone is a game changer.

1/32 Tamiya F15 engines
Michael's F15 engines.

Weathering kits, oil stains, dirt, washes can all quickly and easily be added to your build and take your completed model to a whole new level, it’s all there for the hobby kit builder of 2017 and the YouTube videos show you for free how to use them all, let’s be honest you have no excuse not to make your model look half decent these days.

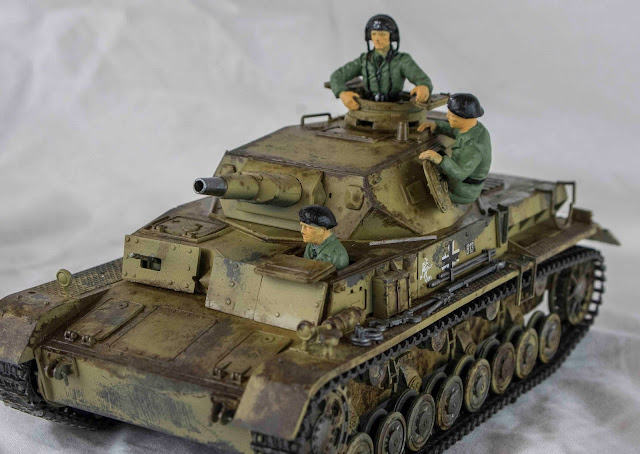
scale model Tamiya 1/35 Panzer

scale model Tamiya 1/35 Panzer
Michael's 1/35 Panzer - lots of hairspray chipping!

1/35 scale Patton tank diorama
1/35 Tamiya Paton diorama.


The kits I have recently put together are the best looking models I have ever built and end up being a talking point over a beer or two whenever a friend drops round, and again thanks to the power of YouTube I can research the history of the vehicle being built so I can rattle off some facts and figures making me sound like I know a thing or two. Another beer cheers mate!    


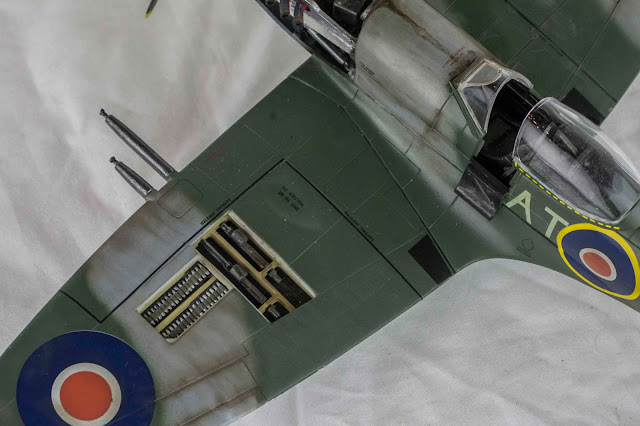
1/32 scale Spitfire model

1/32 scale Spitfire model

1/32 scale Spitfire model

1/32 scale Spitfire model
Michael's impressively weathered 1/32 Spitfire.
Pretty damn impressive considering Michael hasn't modelled since the 1970s...


For me modelling now has never been so rewarding, so enjoyable, and so exciting. I am building model number 5 now and I can see the difference in all my builds. Will my builds ever get to trophy standards? I don’t think so, that’s not what the build is about for me, and we all still all have a life to lead outside of modelling. But thanks to people like Dave who take the time to make videos and share their knowledge for free, any old humble average model builder like me can now build a model to a far superior standard than ever before, and I feel I am already a winner and my models are proudly on display at home for all to see, no longer hidden in a cupboard like the old days.  

Cheers Dave you have been an inspiration.              

       
_________________________________________

Thanks Michael. It means so much to me to hear that, I really respect and admire people who come back to the hobby after a long absence, it can seem daunting all the new ideas and techniques and expensive products can seem too much to take in. But it's also exciting that so much has changed, that the hobby as a whole is more dynamic and keeps striving for realism.

Thank you to Michael for taking the time to write this blog post, and for sharing his photos and his experiences. I owe you a beer next time I'm in Western Australia mate :)

Cheers,

Dave


Wednesday, September 20, 2017

Sci-Fi build - further sketches and adapting as you go

The Sci-Fi anti-gravity build continues. I've been sketching up some revised ideas, adapting the original ideas as I go.


That poking-out engine thruster thing was never part of the original designs.


I don't think sketching is essential - I know not everyone can draw. But what I do think is essential is the ability to adapt as you scratch build. Bits and pieces don't go together in the way you expected, and other pieces organically evolve into funky new ideas you hadn't previously considered.


That's one of the most beautiful parts of scratch building (in case you haven't previously noticed, I really do love it when there is an element of chance in modelling, when there is something random and organic that happens - that's where the real magic is for me as a builder).  But you do have to adapt as a result, and these sketches are my own humble attempt at keeping on top of the crazy developing ideas in my head.

Plus it whiled away a bit of boring time at work. Pfft, work, getting in the way of important modelling time... ;)

Cheers,

Dave

Tuesday, September 19, 2017

An awesome 2.5 metre long cardboard model of the battleship "Yamato"

I love it when my preconceived ideas about scale models are challenged. In my head, scale models are plastic generally in one of several established scales, and the art is in building and painting and weathering to make your version as realistic as possible.  When I encounter something impressive that is outside of these boundaries, my mind is officially blown.


So when I found this tweet about a cardboard battleship model, I was in heaven.

The original tweet was by OrcamanS, and was in Japanese, but thanks to the wonder of Google Translate, here is a rough version of what he said:


"I did not have any money so I made a battleship Yamato with cardboard and Bond sharply. I think that the total length was about 2.5 m and the cardboard was about 50 to 80 big sheets."


And here are the photos. Wow. Just wow.


Pictured: Ohmigawd, did you really make that out of cardboard???


How great is that?!?! I would never even consider making a model of a battleship in cardboard, and while there are some slight compromises when it comes to curves on the hull, you can't be anything but impressed with the result.

And the coolest thing is that this is just one guy's obsession, one guy's passion. He wanted a really, really big replica of the "Yamato", and it wasn't commercially available, so he did it himself. He didn't have lots of money to throw at it, so he made it out of cardboard. I love cost saving measures like that! And the beauty of his creation, what sets it apart from every other "Yamato" model, isn't the weathering or a trick paintjob, it is the self-evident passion that went into the build.

I tip my hat to OrcamanS!

This model reminds me a lot of the incredible 1/10 scale "Yamato" in the Yamato Museum in Kure, Hiroshima, Japan. I really want to see this in person some day...


That is a very big model. Source.


Here's to insane people who scratch build really, really big models. I love your crazy ideas.

Cheers,

Dave


Monday, September 18, 2017

Amazing weathering references: "Abandoned Wrecks" by Chris McNab

I recently came across a series of amazing weathering reference photos. It's a book called "Abandoned Wrecks" which captures photos of forlorn, weather-beaten machines around the world. What a great job travelling and shooting these old beasts - (career # 153 added to my list of "That would be a dream job to have"). I won't go on much more here, I'll let the photos do the talking, but obviously these sorts of images are just gold reference material for those of us who like to model old, derelict machinery.


"Abandoned Wrecks" by Chris McNab is available from Amber Books Ltd.


Cover.


All images come from this source.

This is my favourite image: a crashed Dornier Do-17 bomber. I believe this crash site is in far northern Europe, somewhere like Greenland or Norway.


Great sun-faded paint.
Yeah. that's some pretty extreme weathering there...


Love those rust streaks and worn away patches of paint.


This one is in Homebush Bay, in Sydney, Australia.


As you can see, some of these are rather extreme weathering, they're more "abandoned for decades", but for references of naturally occurring decay they are spot on.

Cheers,

Dave

Sunday, September 17, 2017

Competition: Subscribe and win an AK Interactive Flesh and Skin Colors Set!

Today 17th September it is ONE YEAR since my first blog post on Dave's Model Workshop. Woo hoo! 192 blog posts and 60 videos later, I wanted to find a way to say "thank you" to you all and to celebrate the one year anniversary, so I'm offering the chance for one lucky subscriber to win a brand new AK Interactive Flesh and Skin Colors Set, which contains six acrylic paints specially formulated to paint realistic skin tones. All you have to do to be in the running is be subscribed to my blog by midnight Australian Eastern Standard Time on Sunday 1st October 2017. To subscribe, simply fill in the "Subscribe to automatically receive my latest posts" box at the top right hand corner of any of my blog pages.


The Prize

The AK Interactive Flesh and Skin Colors Set (AK3010) is what I use every time I paint figures. I've written about it before, and how highly I recommend it. It's versatile, the pre-shaded colours can be used as is to give a professional finish to your figures' skin, but you can also tweak the shades yourself to give radically different skin tones - it's not just for painting white European figures. It really does take a lot of the guesswork out of trying to paint authentic skin tones.

AK Interactive Flesh and Skin Colors Set. It's good stuff. - Source.


The Competition

As I mentioned, to be in the running all you have to do is be actively subscribed to my blog before midnight AEST on Sunday 1 October 2017.

To do this, just enter a valid email address in the subscription box at the top right of my blog ("Subscribe to automatically receive my latest posts") and then confirm your subscription via the automatic email you receive.

On 2 October I will use a random number generator to chose which person is our lucky winner, and I will then contact them using their email address and arrange postage to them, wherever they are in the world.


The boring Terms and Conditions

Time for the boring stuff:

  • There is no cost to enter.
  • I will not share a single email address with any third party, apart from my blog subscription software (Feedburner).
  • By subscribing, you will automatically receive update emails when I post new blog posts. That's the only use your data will be used for. It's good stuff, I promise you.
  • No third party is a sponsor of this competition.
  • Facebook, YouTube, etc are not officially endorsing this contest.
  • All subscriptions must be verified (i.e. when you hit "subscribe" you will receive a verification email - you must have completed the action in this verification email for your entry to be valid).
  • All existing verified subscribers are also in the running.


Good luck everyone, and thank you for coming with me on this over the last year. It's been a blast, I'm loving it, and hope to bring you tips and videos and ways to save money for many more years.

Cheers,

Dave


Thursday, September 14, 2017

I've begun scratch building the anti-gravity engine of my Sci-Fi project

After a bit of a delay, I have started scratch building the engine of my science-fiction scale model diorama. I had two or three weeks between finishing the seascape base and starting the actual ship where I just couldn't get stuck in. Partly it was due to a visit from my Father-in-Law who came to stay with us for the first week of September (it's hard to excuse yourself to go off and build models when you have guests staying with you...) and partly it was that I was slightly daunted by the idea of starting the scratch build.


Scratch building is a little daunting. You look at a mess of bits and pieces, plastic bottles and chunks from old printers, and you think to yourself "Now how the hell do I make this into something?"

All I can offer as advice is: just do it. Get stuck in. You can over-think it for weeks and months, always looking for one more piece to add, or you can just start it and adapt as you go. Once you start, the inertia-killing big-picture boogieman of "How do I do this?" is slain and you'll find yourself thinking more about the fun details: "How do I make that one little piece?" or "What would look convincing attached to the bit I just built?"

Here is where I am at as of tonight.

This is the basic engine, as seen from below.

Scratch building an engine on a scale model 

Scratch building an engine on a scale model
Lots and lots of pipes and details still to be added.

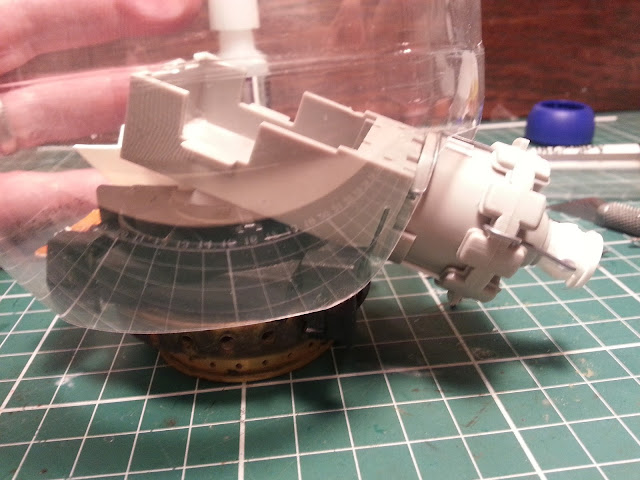
And here is the engine, mounted inside the hull.

Scratch building an engine on a scale model

I must say, I'm enjoying working with a transparent hull. It's making it so much easier to see how large assemblies will fit inside the main frame. I wish all aircraft fuselages came as transparent plastic, it would make fettling the bits inside so much easier!

The jet thruster bit made out of a leftover 1/32 radial engine was an adaptation, it wasn't in my original plans.


Original plans from November 2016.


But I decided on the fly that it needed it, otherwise all the detailed engine-y goodness would be visible only at the very bottom, and hard to see once its mounted to the base. Adapting, thinking and creating as you go - that's the essence of scratch building, that's the fun of it. I love it.

Anyway, it's good to have made a start, I'm enjoying thinking about what bit to add next. Stay tuned, more updates to come as it progresses.

Cheers,

Dave


Wednesday, September 13, 2017

Do you keep the old boxes from scale models you have built?

I was going through some old kit boxes, looking for spare bits and bobs and any unused pieces left on the sprues, when I realised that I keep a large number of old boxes from kits I have previously built. They are large, they clutter the place up, and get in the way of important new kit storage in my stash. Am I the only one who hoards these old boxes?


Do you keep old boxes from scale model kits you have built?


Last night I took the plunge and went to throw away one box, a 1/35 Heller Pzkpf 35-H (a reboxed Hotchkiss H-35 from the 1990s). I built this tank way back in 2007, so I've been holding on to this box for ten years. It has moved house with me twice in that time. And the kick is, I have always really hated the box art ever since the day I bought it.


Pictured: Plug-ugly box art. That really is nasty.
Source.


Why did I keep this?

Don't get me wrong, I'm all for keeping sprues from finished models which contain pieces that weren't used in the build - amassing a collection of these bits and pieces over time is essential, they are worth their weight in gold. But the boxes are another matter entirely.

I made a video on the subject, and loaded it to YouTube. The first comment, from Panzermeister36, mentioned that he keeps old boxes as they sometimes have good memories associated with them. I had never consciously thought of that before, but it is true, when I handle an old kit box I do remember the build, so maybe that is part of it.

Perhaps a larger part of it is that I tend to be a hoarder, something that my partner likes to regularly point out. I can't deny this.

But I'd like to hear from you lot: do you tend to keep old boxes? Or are you ruthless and get rid of them?

The upshot is that I did finally throw away that crappy Heller box last night. Score 1 for me defeating my hoarding urges! Now to move on to the many other old boxes...

Video is embedded below, but in case that doesn't work, here is the link:
Do you keep the boxes of scale models you have built?

Cheers,

Dave