Wednesday, November 30, 2016

Painting faces

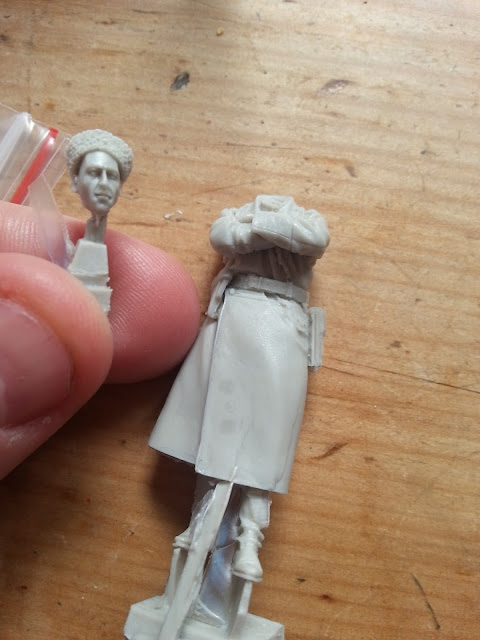
I'm busy putting together a video on how I paint faces. 


It's a process that is 49% satisfying, 49% nerve-wracking, and 2% mysterious as I never quite know what the final face will look like until it is done.

Here's a photo of tonight's progress. This Soviet officer is about half complete.

Cheers,

Dave

Look at those staring zombie eyes.  And look at that ugly fingernail! ;)

Tunisian Tiger diorama - photographs

Here are some still photos of my Tunisian diorama, in case yesterday's video didn't give you enough Afrika Korps action.


Cheers,

Dave


Tuesday, November 29, 2016

Tunisian Tiger diorama - video showcase

Last night I uploaded a video showcasing my completed Tunisian Tiger I diorama.


It's got a suspenseful soundtrack, video panning, the whole works.

I think it's a good way to give a 360 degree walkaround of the completed diorama.

I also included some original WW2 era photos to break up the scenes, just to give a sense of reference and reality to what I have tried to capture.

Anyway, enough of me bragging. What are you still reading this for? Go and check it out for yourself.


Do please feel free to comment with feedback or a critique of my build.

Until next time,

Dave


Thursday, November 24, 2016

Cheap as chips diorama bases from Kmart

I found these at my local Kmart on the weekend.  


(This is Australian Kmart, not the godawful depressing store called Kmart that you find in the USA)

Marble-effect trays (20cm diameter) and a marble-effect candle.  They look pretty good - nobody is believing that they are honest-to-god real marble, but they have a decent solid weight to them and have little protective pads on the bottom surface.

They cost $6 each, so for under 20 bucks I got two round bases perfect for a 1/35 armour diorama, and an upright plinth which will be perfect as a plinth for a 1/10 Hindenburg bust I recently ordered.  Just add plaster groundwork to the dish, and hey presto! instant diorama.

Sorted.

Dave


That plinth will do nicely for a 1/10 scale bust.


In case any readers want to chase their own down at Kmart.

The perfect size for 1/35 armour or vehicles.

That is Just Meant To Be.


Wednesday, November 23, 2016

Figures for my SU-122 diorama

It's been a quiet couple of days as I had a work Christmas party last night. Yes, I know, in November.  Ridiculous. The silly season is upon us already.


Anyway, tonight I was able to do a little work on the newest resin figures which recently arrived. I had previously washed them in soapy warm water to remove any residue on them from the casting process, and tonight I assembled them.

I'm trying two new things here:

1, I'm going to leave their cast bases on, as this will make them easier to handle while painting.  I *think* that the base will be fairly straightforward to remove once they are painted and finished. Fingers crossed.

2. I am leaving their heads off to paint separately. Heads and faces need so much close up detail work, and I am going to try to paint these separate to the body to make handling easier.  I had to trim off some tiny supporting moulds which were holding the chin straps, and it was very delicate here. The resin is rather more brittle than I expected.

Both of these new ideas are very much based on me being able to remove the cast mould easily when the time comes.  Hopefully this doesn't bite me on the arse. Time will tell.

Next up is painting them in grey primer, and then the journey of figure painting begins!  I've got four figures for this diorama: one in the hatch of the tank, and then two or three standing around the tank looking skeptical. My only downside is that two of the figures have crossed arms - greay for my story telling, but will they look too similar, too same-same?   I'm going to paint all four, and then see how they look when I position them around on the diorama groundwork. It's all about assessing as you go, and being willing to change your preconceived plans as the Masterpiece unfolds! ;)

Until next time,

Cheers,

Dave

Before.

After. Not drastically different, I'll grant you.

Monday, November 21, 2016

The Tunisian Tiger diorama is complete!

I have finished the Tunisan Tiger I diorama!


It has been a long road.

But before I reveal all, I have been inspired lately by some very realistic photos of dioramas,with a suitable background behind them.  I plan to take my diorama to a beach I know near Point Cook (just near the Royal Australian Air Force Museum, actually) and try to use perspective and bright natural sunlight to make my diorama photos almost the real thing.

As part of this thinking, I have been having a bit of a play with Photoshop this evening, trying to replicate a 1940s photo feel for one of my diorama shots. Sometimes my career as a graphic designer and my hobby as a model maker align just right.

I hope you like it.  Photos of the full diorama to follow next week.

Cheers,

Dave


And below is the original photo I took of my model.  Now to see if I can fool anyone on Facebook that my mocked-up vintage photo is the real thing.  I'm a cheeky scamp...


Friday, November 18, 2016

Ideas for a new model build: a sci-fi floating lighthouse

Today I've been doodling ideas for a new model build: an anti-gravity floating science fiction lighthouse ship.


I've been inspired by the concept art of the fantabulous Ian McQue. If you don't know his work, you should check it out right now - here's his blog.

It's very early days, but it has rather captured my imagination.  Lots of scratchbuilding, lots of various bits and bobs and gubbins from the spares box. No set historical rules to restrict.  Sounds great.

For every diorama I draw sketches like these to help me work out the final form and position of everything.  You don't need to be the best drawer in the world, but a bare bones plan is essential.

(Plus, if I'm being honest, I just like to draw in quiet moments at work.)

Of course, you also have to be able to re-assess that plan as you go and innovate when you come up against problems. And you will come up against problems.

So, without further ado, I present my Sci-Fi Floating Lighthouse concept sketches:

I'm planning to float it mid-air using strong wire as a simulated drooping guy-rope.

My Technical Drawing teacher from 1989 would be proud.

Lots of gubbins, it's not going to be a polished smart machine.  It's going to be rusty and one step above junk. Excellent!


I have cupboards full of unmade model kits, and yet I am suddenly tempted to dash off and scratchbuild a totally new item. Plus I never build sci-fi models.

That's one of the beauties of this hobby. I never know where it will take me next.

So now I have to work out, will I start this before my next planned armour kit?  I'm a bit off planes at the moment, but I'm really enjoying building 1/35 armour.  Decisions, decisions, decisions...

Until next time, keep experimenting.

Cheers,

Dave

Thursday, November 17, 2016

More resin figures - Soviet tankmen for my SU-122 diorama

Good news!  The rest of the resin figures for my SU-122 diorama have arrived this afternoon.


They are Evolution Miniatures figures in 1/35 scale, and they are just little works of art. On first inspection, I really cannot praise them enough. Crisply moulded, beautifully packed, little to no flash to deal with. The arms and heads look like they will go into position with a minimum of fuss, which is a win compared to my other recent resin purchase - there was a lot of filler required around the shoulder joint of one of the tank crew.

I love the natural drape of the fabrics.

I have included a link at the end of this post to where you can purchase these guys on Amazon. For the detail, I really do recommend the additional cost.

Just look at that crisp detail.

Great facial expressions too.
Just look at that beautiful detail in the face and helmet.

So I will now be preparing these chaps (see here for my video tutorial on prepping resin figures) and starting the adventure that is painting!

I'm going to try to do a video on how I paint faces, as I know that this is one of the most challenging of all modelling skills.  All I can say is that it involves good paints and practise, practise, practise.

I'm excited to get stuck into these guys. Hopefully I find the time this weekend - model making time with a 4 year old is always a luxury.

Until next time, keep experimenting.

Cheers,

Dave


(Click on the below links to go straight to Amazon. Easy as pie, plus I get a little commission if you purchase them - it doesn't cost you a cent more, and it's a great way to show your support and help offset the costs of this blog. Thanks.)


Wednesday, November 16, 2016

Video tutorial: how to scratchbuild a water well in your diorama

I've just finished a long video (almost 15 minutes) on the scratchbuilding of the well scenery in my Tunisian diorama.


The entire thing is scratchbuilt, and I'm tremendously happy with the final result.

Almost all materials were sourced on te streets and parks of my neighbourhood, so it is cheap as chips.

I hope it gives you some idea of the thought process and troubleshooting process involved in making your own diorama scenery.


Video tutorial: how to scratchbuild a water well in your model diorama.

Cheers,

Dave


Tuesday, November 15, 2016

Tunisian diorama milestone: the water well is done!

I'm about to upload a full 15 minute video on the scratchbuilding of the water well in my Tunisian diorama, but I wanted to post a little teaser photo here first.


I'm pretty damn happy with it.

Check back tomorrow for the video link.

Cheers,

Dave

Yep, that's a well alright.


Monday, November 14, 2016

Video tutorial: how to build and prepare resin figures


Resin figures. They can seem a little intimidating, and the additional cost of these compared to normal plastic figures makes them seem daunting.


But in all honesty, as long as you have the right glue (cyanoacrylate - see the Amazon link below, this stuff is the BEST) it's just like a normal build.

Remember to wash them first though!  Oils from the production process tend to remain on resin figures, which can make it difficult to get your paint to adhere.

Check out the new video tutorial - you'll see how easy it is.

Video tutorial: Preparing 1/35 resin figures for painting.

Until next time,

Cheers,

Dave

How to build resin figures
How to build resin figures. Easy.


Sunday, November 13, 2016

The first resin figures for my SU-122 diorama have arrived!

Woo hoo!  The postman delivered these on Friday!


I love the detail in resin kits.

My Soviet SU-122 diorama begins to take shape.

Cheers,

Dave

Soviet tank crew in 1/35 scale.

Soviet officer in 1/35 scale. He looks suitably skeptical.


Thursday, November 10, 2016

1/35 Japanese Kurogane 4x4 staff car diorama - INDEX of all posts

So in writing up my "How to"s on the Japanese staff car diorama, we ended up with EIGHT posts spread over a good month. I thought it might be helpful to have a single page index, with links to all of the various posts.


Here you go, how to make a 1/35 Japanese staff car diorama in eight easy steps:

Part I - building and detailing the kit and initial bare metal basecoat

Part II - the Hairspray Technique

Part III - wheels and figure poses

Part IV - finishing the figures, and scratchbuilding the folded hood

Part V - adding action and movement to a static model

Part VI - sculpting and building earth on the diorama base

Part VII - adding jungle vegetation to a Pacific diorama

Part VIII - finishing touches


I sincerely hope you've found something interesting in these posts, and something you're tempted to try for yourself.

Please do comment or contact me with any questions or feedback.

Cheers,

Dave


Wednesday, November 9, 2016

Building a 1/35 Japanese Kurogane 4x4 staff car diorama - Part VIII: final steps

The final steps!


When we left off in Part VII, we had just added jungle vegetation to the diorama.

Final steps


The final elements were as follows:

I added rust to the chipped areas on the car. For this model I made my own rust "paint" using steel wool and vinegar, but I have since discontinued this as I have found a pre-packaged rust paint set gives better results.  However, if you want to mess around with it and save money (it is ridiculously cheap, I can't deny) then go to this link:

http://massivevoodoo.blogspot.com.au/2010/01/tutorial-how-to-create-real-rust.html

The rust looks good, but I've since gotten better.

Not bad, I'll grant you...

Okay, it's actually pretty good.  But I still have a better technique now - check back soon for a video tutorial.


I also painted dust on the windscreen. Masking tape cut to size to indicate where the windscreen wipers would have cleared the dirt, and then a gentle light airbrushing of earth paint on a low psi.

Dusty windscreen? Check!

And that was it - finished!

I hope you have enjoyed this series on my Japanese staff car diorama.  Here are some final photos of the completed result.  Please do ask questions or give feedback, I'd love to hear from you.

Until next time,

Cheers,

Dave