Tuesday, February 28, 2017

Adding mud to the Sherman tank

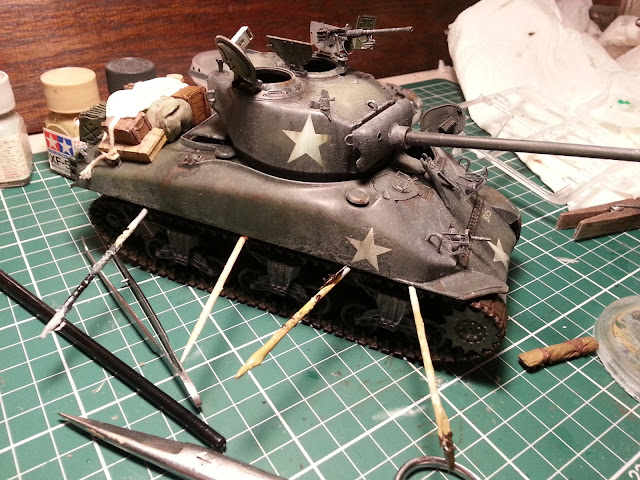
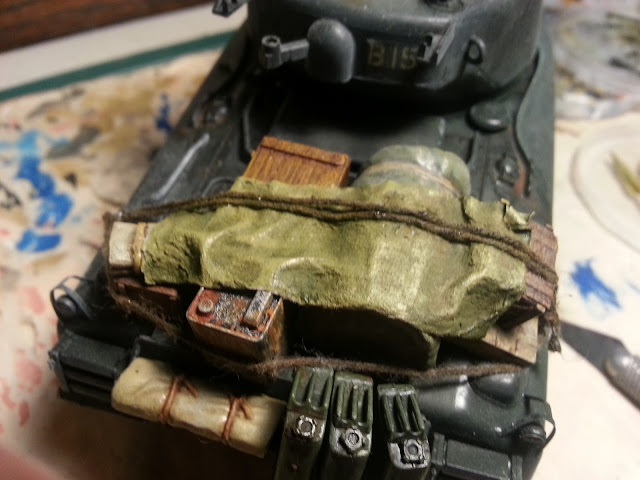
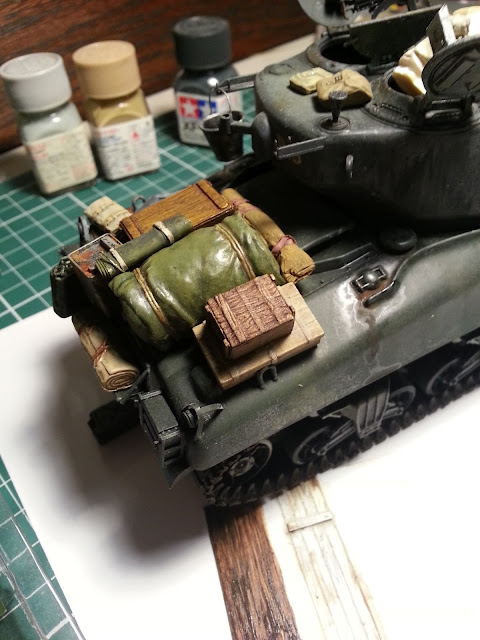
I've been busy adding mud to my Sherman tank. As mentioned previously, it's a process I find nervewracking. It's a fairly organic and unpredictable process, you can really bugger up a model that was looking amazing, and it's pretty much impossible to backtrack from. So how is my effort looking?


To model mud I use my patented 3-ingredient mud technique - you can find out more about it here or you can just view the YouTube video tutorial here - it's easy and cheap, so I'm a bit of a fan.

I started tentatively - easy does it.

Yeah... nah.

Just not enough mud.

Not enough at all.


I left this to dry overnight, but it just didn't look muddy enough, and the colour was a bit too monotone - there was no sense of various layers of accumulated mud. A vehicle would have dried older mud and darker, wetter looking recent mud.  So tonight I went back for more.


Rookie mistake

Tonight I realised that I hadn't painted the black rubber on the road wheels. I don't know how this escaped my attention in the 8 years this baby has been sitting around partially completed... Sigh. But then I figured if I was increasing the amount of mud, this might actually save my arse - although I don't like applying mud to my models, it is just great at hiding cock-ups. [Cue evil laugh: bwahahaha!]


More mud

My plan was to apply a lighter tone of mud to simulate dried older mud deposits, and then use darker, richer oil paints to make a glossier and darker layer of fresh, wetter mud.

The mud palette, aka an old plastic lid. This stuff is like concrete when it's set, so do this on something you are happy to throw away when you're finished.

In this image you can see the three tones of mud. From left to right: the original tone (plain old Tamiya XF-52 Flat Earth); then the lighter tone (50% Flat Earth mixed with 50% Desert Yellow XF-59); then the wetter more recent mud (50% burnt umber and 50% VanDyke Brown artists' oils); finally, the red dish contains the garden dirt I use to give the mud texture.

And here is the end result as of this evening:


I particularly like the splattered effect above the tracks.


It's definitely looking better than 24 hours ago. I will wait to see what it looks like tomorrow, I find the colour can change a lot as the PVA glue in the mud mixture dries.  My gut feeling at the moment is that I will need to airbrush a surrounding spray of the lighter dry mud tone to make it look more like that is the bottom layer - did this a bit back-to-front, it would have been much better to apply the lighter dried mud first, then layer the others on top, as they would have actually accumulated in real life.

Like I say, this whole mud weathering malarkey is nervewracking.  Hmm, maybe time to build a plane next...

Until next time,

Cheers,

Dave


Wednesday, February 22, 2017

Fragile egos in model land

In recent days on Facebook there have been some, how shall I put this... rousing ... discussions about egos and "butt hurt" within the hobby.  It's surprising.


I don't want to get too deeply into the minutia of the drama, and I won't mention names or link to any blogs or channels. Short synopsis: One guy has a blog post where he complains that every video he loads to YouTube gets three dislikes within twelve hours. He seems to imply it's the same three well-recognised people each time.

This gets picked up by a modelling group which I am a member of, and which I massively respect.  And a lot of terms such as "butt hurt" get thrown about.

I dunno. My take is that maybe the blogger is a savvy marketer. He's getting lots of clicks and views, and as Oscar Wilde said, "the only thing worse than being talked about, is not being talked about". People are visiting his blog and viewing his videos to see what the kerfuffle is about.

What I did want to talk about is how surprised I am at how fragile egos are in the model making hobby world, and how catty it can be, particularly when the model makers are of a high skill level. This sort of palavaer doesn't happen with 16 year olds presenting their first modelling efforts.

I saw a similar fracas about six months ago, and asked my partner whether she saw this sort of thing on Facebook in the crafting / knitting groups she follows. Upshot is, she doesn't. But I have seen it with various model making groups on Facebook, and also in specialised militaria-collecting groups on the same platform.

Now I'm going to start generalising here.  And they are going to be big generalisations.

Generalisations:

1. Most model makers are male
2. From what I have seen, most are aged 30-40 plus.
3. This seems more common in modellers with advanced skills.


So why the histrionics? My partner thinks it is a pissing contest, a number of guys want to be the Alpha Male.

I have a theory that it is like the pettiness of university academics: when you get smart people who are at the top of their game, in the absence of any real life problems the smallest issue can become a big drama.

I think also there is an element of competitiveness. Even though the people involved this week live on different continents, and most likely will have never entered models in a competition against each other, there is always a risk of sour grapes and a temptation to think "I would have won if the judges / crowd / YouTube meanies / Philistines weren't against me". Hell, I've walked away from an IPMS contest feeling robbed, and I literally don't give a shit about small plastic dust-gathering trophies.

Finally, I also think there is an element of shit-stirring. It's the internet. Trolls are abundant, and out for lolz at the expense of people with fragile egos.

The upshot is I am always surprised at how modelling can lead to bickering among grown adults. Do I have a solution? Nope. But build what makes you happy, screw the rivet-counters and remember: it's a hobby - you only have to satisfy yourself. It's not 9to5 work where you are accountable to other people, it is time off where you are only answerable to yourself. That should make you want to improve your abilities (who wants to build the same stuff for year after year and never develop new skills? Boring!) and there is most definitely room for constructive criticism to spur you to improve - in fact, that is essential. But build to a level where you have satisfied your own critic (this time at least) and enjoy yourself.

And don't feed the trolls.

Cheers,

Dave


Monday, February 20, 2017

Visiting an old-school hobby shop

On Saturday morning I visited a hobby shop I haven't been to before. And I loved it - it was like stepping back in time.


I went to Hobby HQ in Thomastown, a northern suburb of Melbourne. It's nowhere near any part of Melbourne I usually visit, and it ended up being an 82km round trip to get there and back.  But it was worth it.

My mate Ian suggested I visit Hobby HQ as they are closing in a few months (thanks Ian). The internet kills another bricks and mortar retailer...

It's in an industrial estate, and from the outside doesn't look like much. But walk through the door and there are floor to ceiling shelves full of modelling gold. It is massive.


Like I said: fairly unimposing from outside...

Floor to ceiling. I am in heaven.

That's a lot of model making stuff right there.


And the kits!  It was a little time warp. Along with every new release, there were kits from the 1970s and 1980s that I remembered from when I was a kid.  Check this out: Matchbox 1/32 German and British soliders.  Terrible kits, but what nostalgia!

It doesn't get much more old-school.

I remember this so vividly from my first visits to model shops in the 1980s.

Man, they don't produce cover art like this any more.


There were other retro gems. I'm not much of a car modeller, but check out this baby.

I can practically hear the "Yeee-haw" in my head when I look at these boxes.

Wow. I have no idea who this NASCAR guy is, but I love that they painted his hair with a BIG brush.

And look at these other retro offerings.  This box art was designed to make you fall in love with the kit, and (for me, at least) it still works.

It helps that I already love Jaguar E-Types to an unhealthy degree.

Oh wow, those faces are so dodgy. I love it.

Don't get me wrong: there were plenty of up-to-the-minute new releases as well, lots of photoetch detailing kits, in fact the retro stuff was a tiny minority. But when I discovered them, it was a flashback to my geeky low-tech beginning in the hobby. And it is so rare to find a model shop which still stocks this esoteric stuff. Sure, you can type it in online and find it in a flash and get it delivered to your door. But to browse the physical boxes was just sublime.

In the spirit of retro modelling, I purchased a kit first released in 1973.  Nineteen seventy - freaking - three!!!  The Tamiya Hanomag Sdkfz251/1 halftrack in 1/35 scale. I built one of these babies in about 1985-6, and it was a pleasure to build compared to Revell or Italeri offerings at the time.  I look at it today and it is low-detail and rather long in the tooth. But that will be the pleasure of it - trying to take that 44 year old engineering and bring it up to 2017 standards. I can't wait.

That said, I think the five included figures are beyond saving...

This was a revelation in the 1980s.


Copyright 1973. I have been warned.

I'll try to find my old halftrack that I built back in the 1980s for a future post. It will be terrible.

So what's the final verdict? Three things:
1. It's good to visit bricks and mortar hobby retailers, because you don't want them to all die off.
2. It's good to see how far the industry has come.
3. And it's fun to get nostalgic about crappy old kits.


Cheers,

Dave


Friday, February 17, 2017

Almost 500 subscribers on YouTube!

Hey, I just wanted to say thank you to all of you who have subscribed to my YouTube channel. As of this afternoon we are at 492 subscribers - that's incredible!


Every video I put out is a little labour of love, and you guys seem to receive them so well. It's very gratifying. Thank you.

If you haven't already subscribed to my YouTube channel, please consider doing so - just click here and hit "Subscribe". It means you get automatic emails when I upload any new video, so you won't miss out. Plus, you know, it means that I feel the love people ;)

Thanks again,

Dave


Thursday, February 16, 2017

Painting the tarp on my Sherman tank scale model

In my last post on the Sherman I had just added the stowage and tarp (link here).  Now it's time to make that manky damp tissue look real. Bring on the paint!


But before that, I noticed that the elastic band style tracks were curving above the rollers on top - real metal heavy tracks don't sit above the rollers. So I glued them down and left toothpicks in overnight to keep them sitting properly. It's a small thing, but that kind of little oversight will be enough to consciously or subconsciously mess with viewers' perception of your final diorama, and ruin that carefully constructed sense of realism you've worked so hard to achieve. It's worth correcting.

Fixing the elastic band tracks on my 1/35 Sherman
It doesn't look pretty, but it will do the job.

Fixing the elastic band tracks on my 1/35 Sherman
Much better than having tracks floating 2-3mm above those rollers.

Then it was time to paint the tarp. I mixed up a custom colour, a mix of Tamiya Olive Drab and Desert Yellow.  The plain Olive Drab by itself was just a bit too dark.

Here it is after a first coat. I was already able to introduce some lighter highlights and darker shadows, purely because as I mixed my colours together there were natural variations in the tone, and I moved to appropriate areas when painting based on the tone I had just mixed.


Stowage on the 1/35 Sherman tank
Nothing special yet.

You can see how the ropes across the tarp have taken on a green tone. I diluted the colour a lot so that it would soak into the tissue, and made covering it easier.  But it did mean the colour soaked into the guy ropes as well. Easily fixed.

Stowage on the 1/35 Sherman tank
Getting there. I'm happy with the shade of green.

I then started drybrushing on some highlights, and adding some shadow tones.

Stowage on the 1/35 Sherman tank
Highlights have been drybrushed on.

Finally, I used highly diluted Vandyke Brown oil paint to darken the guy ropes. There is a bit of a green tone still on the ropes over the top of the tarp, but I will do a second coat and then drybrush highlights on the rope overall - should solve that issue.

Stowage on the 1/35 Sherman tank
Still a greenish tinge to those ropes...

Next up: adding a finer rope at the back to hold those jerrycans in place, and some powdered pigments to try and tonally tie all that stowage together a bit more.  Currently it feels like there are a lot of different colours and tones happening, and I want it to look more consistent, like it has all been in place for a while as the tank drove through dust and mud.  Lots of weathering to come!

Until next time,

Cheers,

Dave


Wednesday, February 15, 2017

Video tutorial: How to make a clear headlight lens for scale models

We've all been there. You are working on an older kit, armor or a car or a motorcycle or a plane kit from the 1970s or 80s, and you realise that there isn't a clear sprue included. Uhhm, what? No transparent parts? That means one thing: crappy solid plastic headlights. And that looks terrible.


Not cool.

Yuk.

I get it, kits back then had limitations. But solid plastic headlights are Not Good Enough in the 21st Century.

Luckily, there is an easy way to replace those solid plastic headlight lenses with home-made clear lenses. It's ingenious and cheap, and that is exactly how I like to build my models.

I first saw this tip a few years ago, and tried it once. It recently resurfaced in a discussion I saw on facebook, and as I am currently in the process of resurrecting my old 1960s-era White Scout Car (which had terrible concave solid lenses!) I thought it was the perfect opportunity to do a "how to" video tutorial to share with you lot.

It really is a rather clever technique.


Have a look at the video, and let me know what you think. As an added bonus, it's fun to do.

Until next time,

Cheers,

Dave


Friday, February 10, 2017

Avoiding "The Shelf of Doom" - adding stowage to the Sherman tank in my new American diorama

I find two moments are real bottlenecks when modelling armour, points in the build where if you 're not careful you can get bogged down with indecision and end up putting the kit onto "The Shelf of Doom" where unfinished builds go to languish for (sometimes) years. 


The first bottleneck moment is adding mud, and the second is adding gear.

Adding mud

Do I really want to gloop mud all over the beautifully made and painted tracks, wheels and suspension?  All that hard work getting covered in a layer of bleurgh!  I hate doing this, even though the end result is always more authentic if you're modelling a realistic, in-the-field vehicle.  But pushing yourself to daub on that first glob of crap is difficult.

Adding stowed gear

A similar moment of indecision. You've modelled and painted the rear deck. If you're being extra keen, there is expensive photoetched brass on those exquisitely-detailled grilles and grab handles. And now you need to obscure it with boxes, rolled tarps, knapsacks and other miscellaneous gear.  Once again, the finished result makes it worth it, but it's a tough moment to add that glue and lock it all in place.

I don't know about other modellers, but I find these two moments really difficult to push on through. In some ways, it's easier to just put the kit aside, even though it is what, 80 or 90% completed, than to commit to this. I do have a "Shelf of Doom" where I put them. And it's dumb-arse to do this.

__________

So this week I've made a little more progress on my American diorama (previous resurrection of these Yankee models here) and added stowed gear to the Sherman M4A1 tank I put aside in 2008 - a process fraught with indecision... I did a dry run first with painted gear, worked out what looked best and most logical (would a tank crew really carry a single wooden chair around Europe with them? Really??? I see this all the time in dioramas, a random chair proudly strapped on the back of a tank. Pffft, nup, not on my dioramas!).  Then I took a deep breath, opened the glue, and committed.

Next up was a tarp made from a folded up tissue, liberally splooshed with a mix of 50% white PVA glue and 50% water. This makes it drape in place a bit more realistically, followed by some sturdy ropes to hold it all in place while the tank bumps through ditches and hedges.

Take that, Shelf of Doom!

Do I have any advice for other modellers about how to avoid the Shelf of Doom? All I can say is think about your project, and come up with a solid story you are trying to tell. Action, funny, poignant, resting, whatever - without that all-important hook, you will always feel a bit indecisive about completing your build.  With a solid story in place, you'll be cool to commit because you want to move on and build the next piece of the story.  In my experience, that story makes all the difference.

Now to salvage the White Scout Car that has sat on The Shelf next to the Sherman since 2008...

Cheers,

Dave

Stowage on a 1/35 Sherman scale model tank
Test fitting.

Stowage on a 1/35 Sherman scale model tank
More test fitting. I'm not a fan of that gloss finish on the rolled tent though...

Stowage on a 1/35 Sherman scale model tank
Still need to tie down the jerry cans on the back shelf.

Stowage on a 1/35 Sherman scale model tank
All securely tied down.

Stowage on a 1/35 Sherman scale model tank
Wet tissue. It will look better once it's painted.

Stowage on a 1/35 Sherman scale model tank
Everything glued in place.


Thursday, February 9, 2017

I'm convinced - I need to start casting my own resin items

This week I am art directing photoshoots at our photography studio, and one of my mates at the studio brought in some goodies to show me. And now I am convinced - I need to start casting my own duplicates with moulds and resin.


My mate Patto restores old motorcycles, and recently he needed to replace a worn old Bakelite item. I think it's a distributor cap or something (I don't know, engines are most definitely not my strong point...)  An original proved too hard/expensive to locate, and he had the brilliant idea of casting a replacement using the original that he had.

So he hit up a store called Barnes in Richmond, a suburb of Melbourne, that specialises in casting supplies. I didn't even know it existed.

The products he used are as follows:
Easycast Polyurethane resin - link here
and
Pinkysil fast setting silicone - link here

For about 50 bucks he cast a replacement cap, bored it out and drilled a hole for a wire to go in, and now he is set.  The cast picked up every letter of the text moulded in the cap surface, and every little scratch and dent that it had picked up over the decades. It's 99.9% as good as the original.

And now I am convinced I need to get into this casting gig. It looks like a fun challenge, a new skill to learn, and an easy way to save time on jobs with fiddly scratchbuilding that needs repeating.

Thanks Patto. You're the best photo retoucher in the business! ;)

Cheers,

Dave


The silicone mould and the resin used for the cast reproduction.

Replacement cast on the left. Original cap on the right.


Pink silicone mould at top. Patto used an old takeaway container to pour the mould into.

Wednesday, February 8, 2017

What the postie brought today - Part 2

I do love it when I receive a package in the post. Today's parcel was small, but it contained some model making magic.


Four resin figures from Alpine Miniatures for my current project, an American diorama in the Ardennes in 1944. Great, crisp detail, beautiful casting. Each figure has a choice of two heads, a plain steel helmet or a camouflage netting helmet. Faces are natural and expressive.

Every time I pick up a resin figure, I have to begrudgingly admit that the detail is better than normal plastic figures. Dammit. My wallet wishes that wasn't the case. You have probably gathered by now that I like to model on the cheap, but with figures I really can't go past just how much better resin is than standard plastic sculpts...

There's an Amazon link to these little gems below. I really do recommend Alpine Miniatures.

Looking forward to starting these gents soon.

Cheers,

Dave


Lookit that detail!

Needs a good wash in soapy water first to get rid of that release agent sheen. 


Manufacturer's artwork. I'll be happy if mine are close to this good.
I'm planning a little scratchbuilding to make the guy on the right hold binoculars.
Great natural poses.


Tuesday, February 7, 2017

Video tutorial: How to paint wood on scale models - Method 3 of 3


The last in my series of three video tutorials on how to paint wood for your scale models.  This time: painting actual wood.


Yes, I know, it can't be that hard to paint actual wood to look like wood.  I mean, the wood grain texture is right there! Ahh, but there is a trick to it, especially if you want to achieve a weathered effect with your painting.

So check out the video, and let me know if you have any questions or comments. Also, what do you think of the way I split this up into three bite-size videos, rather than one 15 minute long monster?  Is this more convenient? Clunkier?  Depending on the feedback, I may do more How To videos as multi-part series like this.

Until next time,

Cheers,

Dave


Sunday, February 5, 2017

Video tutorial: How to paint wood on scale models - Method 2 of 3

The second of my series of three videos on how to paint convincing wood textures for your models. This time: build and paint your own weathered wood structures out of styrene sheet.


I love this second method because it is the most versatile when it comes to constructing wooden things in your dioramas or model kit builds. You can build anything out of white plastic styrene sheet: barns, boxes, fences, buildings, crates, literally anything.

The trick however is to make it look like real wood. Because it is featureless, smooth plastic, it can be a big job to make it look like wooden planks. And that is where this Method #2 comes in.

The video will show you how to texture styrene, and then paint it to convincingly look like old weathered wooden planks.  It doesn't have the magic moment that Method #1 had where it all just gels, but the coolness here is in the versatility: you can build anything!

So get creative, and if you try it, please do share a photo in the comments below - I'd love to see what you make. Really.

Cheers,

Dave


Saturday, February 4, 2017

Video tutorial: How to paint wood on scale models - Method 1 of 3

Painting wooden texture is tricky. Every model maker struggles with this at some stage.  In this series of THREE video tutorials, I will show you three great techniques for painting wooden surfaces. Let's start with the coolest one - you'll be surprised by how it suddenly comes together so beautifully.


I love this first method of painting wood. You start out and it looks like it's going to be crap and boring. And then the magic happens, and suddenly you have an amazing wood grain finish that looks rich, authentic and detailed.  And it is as easy as falling off a log.

Try it. You can thank me later ;)

Cheers,

Dave