Friday, April 27, 2018

New video: How to apply oil paint dot filters on enamel paints

The established wisdom among modellers is that when weathering you can only apply an oil paint dot filter on an acrylic painted surface. On an enamel surface, the thinners you use to dilute the oil paint will destroy your painstakingly applied base coats. This is not true.


How to apply oil paint dot filters on enamel paints


With a little simple preparation, you can safely use an oil paint dot filter on an enamel painted model. It's easy and simple.

(By the way, I'm rather relieved that this worked! I would have been gutted if I had stuffed up the hull of The Seahorse. Talk about putting your money where your mouth is...)

It worked! It worked!


Video is embedded below, but in case that doesn't work here is the link:
How to apply oil paint dot filters on enamel paints

Cheers,

Dave


I had to force myself to go to bed at 11:20pm last night

When something is just working right, it can be hard to pull yourself away from building. Last night I did some (I have to admit) absolutely cracking weathering. It was just working well.


This little styrene panel is about 40mm x 17mm, and I love it.

Weathered scale model rusty metal panel


Cheers,

Dave

Wednesday, April 25, 2018

ANZAC Day 2018

Many years ago, back in 2005, I visited the battlefields of the Western Front in Belgium and northern France. The fields and bleak weather were quiet and barren, but the cemeteries in particular were haunting.


On ANZAC Day 2018 it is right to pause and remember.

Tyne Cot cemetery.

Tyne Cot cemetery, the largest Commonwealth War Graves Commission cemetery in the world.

List of the missing, Menin Gate.

Villers-Bretonneaux.

"Should I fall, grieve not.
I shall be one with the sun, wind and flowers."

Villers-Bretonneaux school.


Dave

Tuesday, April 24, 2018

MOD Squad update - Metro Hobbies in Australia is now offering 10% discount

Great news for my Australian community - Metro Hobbies has agreed to join The MOD Squad program for a limited time! From tonight until midnight 14 May 2018, MOD Squad members will receive 10% OFF all online orders of model kits and hobby supplies from www.metrohobbies.com.au - plus you will receive free shipping within Australia if your order is $99 or more before the discount is applied at checkout. Brilliant!


Metro Hobbies joins The MOD Squad members only discounts program


Metro Hobbies is my preferred hobby retailer here in Melbourne. I've mentioned them many times before. I trust them, and they know their stuff inside out, so I'm really excited to have them as part of The MOD Squad.

And of course the discount will be available to all existing members of The MOD Squad.

It's for a limited time only, so join up today - visit my Patreon page to join The MOD Squad and see all the benefits you'll receive. You'll also receive the discount code once you've signed up.

If there is a retailer in your country you'd like to see join the program, do please let me know - I'm not an expert on the scale model scene in the US, or the UK, or Europe, and I'd love to know what other retailers you guys would like on board. I'm continually negotiating to bring more value to my supporters - it's my small way of genuinely saying "thank you" for supporting Dave's Model Workshop.

Video is embedded below, but in case it doesn't work here is the link:
Metro Hobbies joins The MOD Squad members only discounts program

Cheers,

Dave


Saturday, April 21, 2018

New video: Unboxing the Tamiya Sand Scorcher RC Racing Buggy

I've undertaken a new challenge: remote control. I've not played around with this since the late 1980s. I don't have the faintest idea what I'm doing, but I'm pushing myself out of my comfort zone!


Unboxing the Tamiya Sand Scorcher RC Racing Buggy


My latest video is an unboxing review of the 1/10 scale Tamiya Sand Scorcher racing buggy that I recently purchased.

I really do feel a bit daunted by this, but it will be fun. It's a cool looking project.

Plus it's another incentive to finish The Seahorse sooner rather than later! ;)

Video is embedded below, but in case that doesn't work here is the link:
Unboxing the Tamiya Sand Scorcher RC Racing Buggy

Cheers,

Dave


Tuesday, April 17, 2018

Painting insignia on The Seahorse

I feel I passed a rather large milestone this evening. I finally hand painted on the seahorse insignia onto the hull of The Seahorse.


I originally came up with this idea back in October 2017 - six months ago! Phew, slow progress...

I started off designing the basic shape using vector illustration:

Seahorse vector illustration


Then with that reference close by, I first drew a rough positional outline with a fine-tipped mechanical pencil:

Painting the Seahorse insignia on the hull

And then holding my breath I took the plunge with paint and paintbrush:

Painting the Seahorse insignia on the hull

And finished it up.

Painting the Seahorse insignia on the hull

It's about 30mm tall, roughly 1 inch.

I think I'm happy with it - I may put a solid black inside so it's a black seahorse with a white outline, more like the serial numbers nearby. I'll sleep on it tonight and re-assess tomorrow if it needs tweaking.

Progress!

Cheers,

Dave


Friday, April 13, 2018

New video: Painting and weathering - in depth hairspray chipping tutorial

Back in December 2016 I produced a video demonstrating the hairspray technique for chipping paint on scale models. That was fine for then, but I have tweaked my hairspray technique since then, and I thought it was time for a revisit.


So I have produced a new video on the hairspray technique. It's a more in-depth view, with a slightly more finessed technique that gives better results.

Painting and weathering: in depth hairspray chipping video tutorial


The main difference is that I find thinner layers of both hairspray and also topcoat paint gives a much, much better result. It becomes a lot more controllable, and it also avoids those massive chunks where a big section of topcoat sloughs off all at once.

So check it out. You may think you know how to do this technique, but this hopefully gives you a little more insight on it.

Video is embedded below, but here is the link in case it doesn't work:
Painting and weathering: in depth hairspray chipping tutorial.

Cheers,

Dave


Thursday, April 12, 2018

A little hint of how the painting is coming along

I'm not going to reveal too much - all in good time my friends! But here are a couple of shots showing how the painting of The Seahorse is progressing...


I'm happy with it so far, but there's still a long way to go.


Cheers,

Dave

Saturday, April 7, 2018

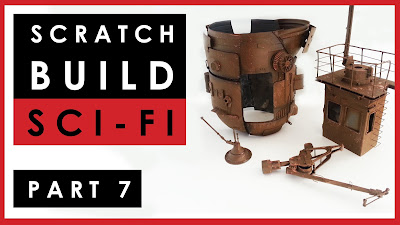
New video: Scratch build sci-fi ship The Seahorse Part 7

Wow, we're up to Part 7 - this is a long term project! In this video I finally, finally get some paint on the hull of The Seahorse. It's no longer transparent! It makes such a difference, suddenly I can appreciate what the final product will sort of look like.


scratch built sci-fi model in 1/35 scale - Part 7


I also build the communications mast in this video. I'm extraordinarily happy with how the mast turned out, it gives off a suitably "Star Wars" vibe and reminds me of something from Cloud City.

scratch built communications mast in 1/35 scale
I really do like the communications mast I cobbled together out of bits and pieces :)


This episode sees some of the biggest jumps forward for this build - a lot happens in this one.

So go on, watch the video now. You know you want to.

Video is embedded below, but in case that doesn't work here is the link:
Scratch building 1/35 scale sci-fi model - Part 7

Cheers,

Dave


Thursday, April 5, 2018

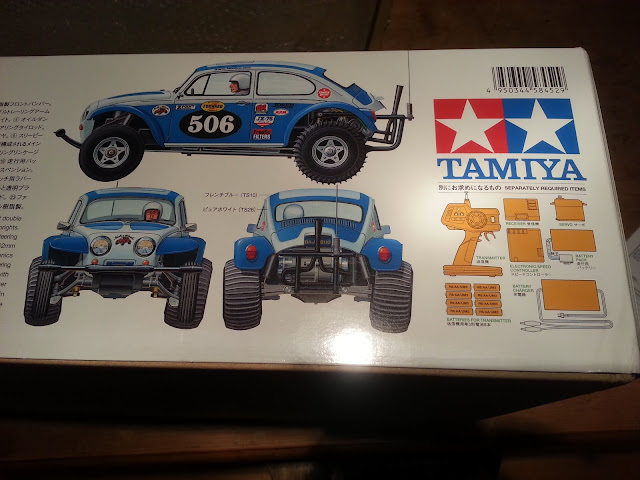
Tamiya 1/10 RC Sand Scorcher - The next project has arrived!

The postie delivered a very welcome (and very large) package from Japan yesterday.


RC Tamiya 1/10 scale Sand Scorcher 2010 re-release


It's a Tamiya Sand Scorcher remote control 1970s VW Baja Bug. I've always loved this kit, and I figured it's time to give it a crack. I've not messed about with RC since the late 1980s (holy shit, that is a long time ago...)

This is a 2010 re-release from Tamiya, it's not an original 1979 kit. I found a bargain on ebay, and also received a 10% promotional code from ebay, and these combined made this much more affordable so I decided to just bite the bullet and do it.

RC Tamiya 1/10 scale Sand Scorcher 2010 re-release

RC Tamiya 1/10 scale Sand Scorcher 2010 re-release

RC Tamiya 1/10 scale Sand Scorcher 2010 re-release


I actually saw a 1/1 scale (i.e. real life) Sand Scorcher buggy at the Tamiya HQ when I visited four months ago, and that original colour scheme is pretty irresistible. You can see the life size version at the 14:26 mark in my video.

So once I finish The Seahorse I can move on to this next project. Exciting!

Cheers,

Dave

Tuesday, April 3, 2018

The Seahorse - finessing the paint scheme

I received a pretty resounding response on Facebook and YouTube that Option C was the best of the three presented in my last blog post. But I did have a couple of people mention that they were surprised that there was nothing high-visibility about the scheme: blue and white look good, but what is to stop another anti-gravity ship from flying into a blue and white ship out on the open ocean? Fair point.


Just to refresh your memory, here was the popular Option C.


So I decided to finesse the design slightly, to include some high-visibility red.

I present to you: Option D:


The red and white reminds me of high-vis communication towers I saw on my holiday in Japan four months ago.

Source.


I think I'm pretty happy to work with this. There will be tweaking and developments as I go, of course, but as a general plan of attack I'm pretty satisfied.

Thanks for all the feedback people!

Cheers,

Dave

Sunday, April 1, 2018

Can't decide on colour schemes for The Seahorse

One of the perks of being a graphic designer is that you have software that makes life easier for modelling. For instance, I was trying out some colour scheme ideas in my head for The Seahorse, and then I realised I could mock  up an illustration of the vehicle very quickly and try out some of my ideas in a much more easily visualised way.


The result of which is this: three colour scheme options for The Seahorse. And I can't decide which I like most.


Option A


Option B


Option C


I might let it mull over in my mind for the next 24 hours, but if you guys have any clear preference I'm all ears. I'm not saying I'm throwing it open to a popular vote, but is there anything that particular works or doesn't work in any of these three options? Whaddya think?

Looking forward to hearing from you,

Dave