Sunday, October 29, 2017

Video tutorial: How to make a scale model WW2 Pacific Jungle diorama

My latest video is an in-depth look at how I created the Pacific jungle scenery and groundwork for my Japanese Kurogane diorama (there's an index of all previous blog posts about it here). Pacific WW2 dioramas are significantly different to European theatre dioramas, and successfully building one requires a different mindset and preparation.


There are still some elements of my diorama that I'm not 100% satisfied with, but overall I feel it is a great little piece: it tells a vivid story, and the diorama groundwork is an essential part of that.

1/35 scale model WW2 Pacific jungle diorama

1/35 scale model WW2 Pacific jungle diorama


In my video I go into detail such as the colour of volcanic soil, the found objects I used, and which brands I used for elements like static grass and moss. It's diorama nerd-tastic!

Video is embedded below, but in case that doesn't work, here is the link:
How to make a scale model WW2 Pacific jungle diorama

Cheers,

Dave


Thursday, October 26, 2017

Guest post: A Star Wars Millennium Falcon model remastered

My good friend Ian Gittins has come up with another impressive model I'd love to share with you. It's an incredible reworking of a Star Wars toy.


In Ian's words:
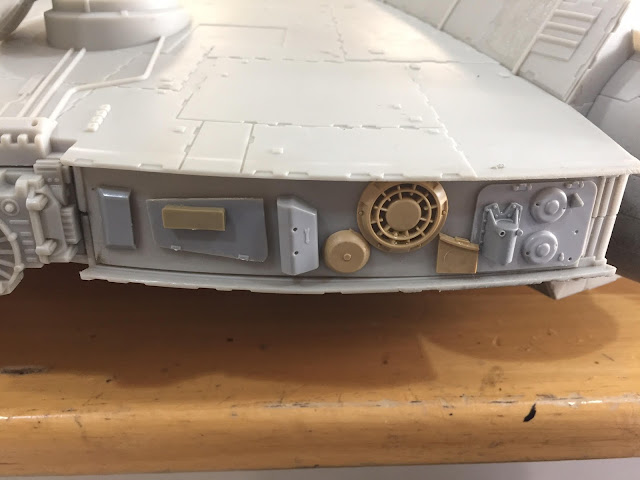
"My son asked me to make his Millennium Falcon look like the one in the movie, so I jumped at the chance. I got a bit carried away with the whole process and added some extra parts along the sides of the ship, most of which you'll be familiar with.

Scale model of Star Wars Millennium Falcon
The original toy without any extra additions.

Scale model of Star Wars Millennium Falcon

Scale model of Star Wars Millennium Falcon
A couple of bits and pieces added by Ian. Panther bits? Or Tiger bits?


Overall it's taken me about a month to complete.

I didn't go all out for movie accuracy, I just went with what felt right and I tried to do as much as possible whilst we had the warm weather because spray painting a model that size had to be done outside.

Scale model of Star Wars Millennium Falcon

Scale model of Star Wars Millennium Falcon
Lots of pre-shading to vary the final paint finish.


The diameter of the Falcon is a whopping 52cm and the length is 74cm ... I think I used about a litre of paint on it too!

With any luck I'll get a call from Lucasfilm with a job offer to work on the next Star Wars movie!"

Scale model of Star Wars Millennium Falcon

Scale model of Star Wars Millennium Falcon

Scale model of Star Wars Millennium Falcon

Scale model of Star Wars Millennium Falcon

Scale model of Star Wars Millennium Falcon
The finished result. Superb.


I love the effort that went into this. It's gone past just an exercise in practising weathering techniques, to becoming a full re-working of an existing build into something much, much more than what it started as. I like how Ian has realised the limitations of the "toy" he was working with, improved that where he can by adding scratch built detail, and then elevated the whole thing with some great painting and weathering.

Now the big question: is your son still allowed to play with it Ian? ;)

Source.


Cheers,

Dave


Wednesday, October 25, 2017

A quiet week

I've been a bit quiet lately - it's been more than a week since my last YouTube video, and I try to get those out regularly once a week, while I haven't done any model making at all in that time. It was my daughter's birthday on the weekend, which was totally over the top, and I've got a freelance graphic design job at the moment which I'm working on at nights.


All I can offer you guys as my own modelling work is a photo of the cake I made for my daughter's party.

It's a My Little Pony princess castle, don'tcha know.


Some modelling skills came in handy. I was all set to start weathering it, but decided that five year olds probably would prefer bright colours to muddy and damp!

Cheers,

Dave

Friday, October 20, 2017

I've finally come up with a name for my sci-fi anti-gravity ship: HMS Seahorse

I'm not quite sure yet if I will go with the Seahorse or HMS Seahorse.


But I'm thinking a cool hand painted seahorse on the side of the hull, painted by the crew - similar to the famous swordfish emblem which was on a U-Boat during WW2.


I've done a preliminary sketch:


It feels good to have finally nailed down a name!

What do you lot think?

Cheers,

Dave

Tuesday, October 17, 2017

Reader's Build: 1/35 Tamiya Sherman tank by Brendan Jordan

Today I've got a special feature highlighting the work of a reader of this blog, Brendan Jordan from Brisbane, Queensland. Brendan has only just recently taken up modelling, and after two aircraft he decided to tackle his first tank.


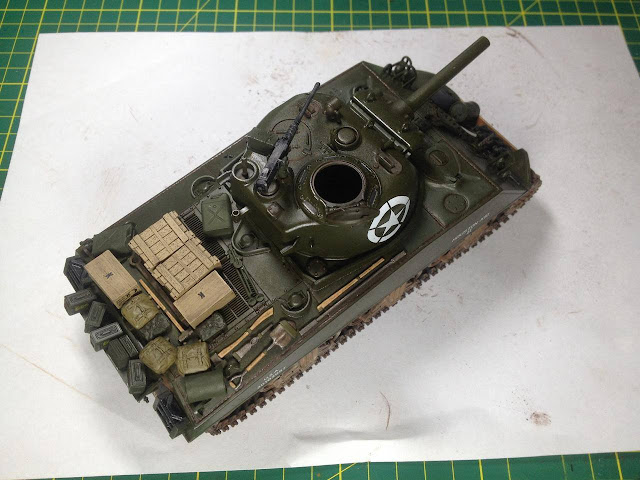
It's a 1/35 scale Tamiya M4A3 Sherman, which is a great tank to start out on.

Early photos of the near-completed build showed a Sherman with some pretty good dirt and dust on the rolling gear, but it ended rather abruptly - there was no mud or dust on the sides or upper surfaces of the tank, and it had an overall slight gloss that Brendan was quick to rectify.

Tamiya 1/35 scale model Sherman tank

Tamiya 1/35 scale model Sherman tank

Tamiya 1/35 scale model Sherman tank

Tamiya 1/35 scale model Sherman tank

Tamiya 1/35 scale model Sherman tank


The finished result


Then, with some further weathering, the Sherman was transformed. Dust, oil stains, more dust, fading, and more dust! I love what a change this made from the earlier shots. This Sherm has obviously had a tough, dirty war, and I love it.

Tamiya 1/35 scale model Sherman tank

Tamiya 1/35 scale model Sherman tank


Tamiya 1/35 scale model Sherman tank


Brendan plans to still add a tarp on the stowage and some figures.

I love this build. It's ambitious for a first-time armour modeller, and Brendan has obviously taken on some techniques that are far from beginner level. I totally respect the thought that has gone into this, and I like the level of realism achieved.

Thanks for sharing it with me Brendan, and for allowing me to share it with a wider audience. I look forward to seeing the final result, and your next build my friend.

Cheers,

Dave

Monday, October 16, 2017

New video: Scale model science-fiction scratchbuild - Part 2

In the last video on my scratch built sci-fi ship, I had built the engine and thruster section. In this latest video, I've been working on the various rudders and the mechanical sections which will mount a large aerlion.


Scratch building a model science fiction ship in 1/35 scale


It's slow progress, but I'm enjoying the scratch building journey.

I also discuss how intimidating I have found it to start to tackle the hull. Even though it's only a cheap, disposable bottle, and thus utterly replaceable, I have found it nerve wracking to contemplate cutting into the hull. It's another of those "once you do this there's no going back" model making moments that I find can be a real bottleneck (previously discussed here relating to irretrevably
splashing mud all over your amazing built tank)

The solution: just push on through.

Video is embedded below but in case that doesn't work here is the link:
Scale model science fiction scratch build - Part 2.

Cheers,

Dave


Thursday, October 12, 2017

Scratch building mechanical detail using a Nerf gun for donor parts

I've been busy this week scratch building more of the engine and mechanical detail of the Sci-Fi build. These are the bits of inner mechanics which will be visible through gaps in the outer hull: in particular, I've been building a section which will mount two hydraulic arms which hold a large stabiliser fin rudder thingee. And my secret weapon in this part of the build may surprise you, as it is literally a secret weapon. (Cue evil villain laugh...)


I spotted this Nerf style dart gun in my local Kmart recently. In particular, I noticed the cool moulded in technological-looking bit on the barrel, and I thought to myself "I can use that..." For five bucks, I was willing to make that investment.

Source.


So I brought it home, and played with it with my daughter for a couple of weeks until the novelty wore off. I was up front about the fact that I bought it to pull it apart for a model, but I rather suspect she will be sad when she sees that I actually did ruin a perfectly good toy...

Scratch building mechanical engine detail using a Nerf gun
On the operating table.

Scratch building mechanical engine detail using a Nerf gun
This is the section that caught my eye. Great mechanical detail.


I unscrewed the two halves, and attacked it with a hacksaw.

Scratch building mechanical engine detail using a Nerf gun

Scratch building mechanical engine detail using a Nerf gun


Some various bits and pieces glued on (yes, that is a drive wheel from a 1/35 Tiger tank) and I have a mount ready for my two industrial welded hydraulic arms that I've been working on recently.

Scratch building mechanical engine detail using a Nerf gun


I think it still needs some various pipes and little details added, but overall once it is painted gunmetal and weathered I think this will be a pretty convincing section of mechanical interior.

(Just don't tell my daughter.)

Cheers,

Dave

Sunday, October 8, 2017

Video tutorial: How to make weld seams on scale models

As part of my current Sci-Fi scratch build, I've built some hydraulic arms. I wanted these to look suitably industrial and rough, and sloppy raised weld seams were part of that look. So I've documented how I made these raised welding lines, and made a video showing you guys how to do them.


As always, what I love about this process is that it is easy and cheap. Easy and cheap = win/win!

All it requires is some materials which you will already have in your modelling toolbox, and a little patience. It's not a fiddly process like scratch building seat belts, it's ridiculously easy, just slightly time-consuming. And the results speak for themselves:

How to make raised weld seams on scale models
Not bad for some scrap styrene and stretched sprue, eh?


So if you have a tank kit where a manufacturer has left off obvious weld seams, get stuck in and make them yourself! The level of realism that these will add makes it totally worthwhile.

Video is embedded below, but in case it doesn't work here is the link:
How to make weld seams on scale models

Cheers,

Dave

P.S. A big thanks to Paul Griffiths for providing the reference pic I used in the video :)


Friday, October 6, 2017

Scratch building a hydraulic arm

I've never actually worked out the engineering of how a bulldozer's hydraulic arm works. I knew they are yellow and have hydraulic pistons on them, but until I set out to scratch build one, I had never actually paid attention to how the pistons move the arm and how the system is engineered. Physics, pfft, I don't need no physics.


I want it to function like the arm on this bad boy.


I love this about scratch building. If you want it to look realistic, you need to do some research and work out how a real machine would work in the real world.

And I now have a little stop-motion video in my head of how a hydraulic arm works. A little like this, although in my head it doesn't have quite such a mid-90s Microsoft clip art aesthetic...


Although these don't look like much now, they will soon be two hydraulic arms which will mount one of the two aerial rudders I recently built.

Scratch building hydraulic arms for models
Scratch building starting off with sheet styrene.

Scratch building hydraulic arms for models
Shaping to make two pieces of the arm.

Scratch building hydraulic arms for models
Two arms, two pieces in each.

Scratch building hydraulic arms for models
Weld seams added with stretched sprue.


I've also been adding weld seams to the metal arm, and will have a "How To" video out this weekend I hope.

Cheers,

Dave

Tuesday, October 3, 2017

The winner of our Subscriber Competition!

I recently ran a competition where everyone who subscribed to my blog was in the running to win an AK Interactive Flesh and Skin Colors set of acrylic paints.


I wanted to say a big thank you to everyone who subscribed and entered!

The lucky winner is Colin Atkins from Auckland, New Zealand.

I contacted Colin yesterday, and he wrote back to me that "this has come at just the right time as I am going to paint a couple of 1/35 German tank crew for a small dio I am doing for a group build. In the past on the few occasions that I have painted a figure, it has just been to slap a bit of flesh coloured paint on and call it done. Now I want to try giving figures a more realistic paint job. Hopefully with the help of a proper palette such as this one, I can start to learn."

Congratulations, Colin - good luck with the German tankers, and I will be getting a set of paints in the mail to you this week.

To everyone else who subscribed, I hope you've been getting value from my blog and I hope you stick around. There's lots more to come, I promise.

Also, I really do wholeheartedly recommend the AK Interactive Flesh and Skin Colors set. For those who didn't win, I have a link at the bottom of this entry where you can purchase this set for the cheapest price I could find on Amazon. Give them a try, you'll be glad you did.

Cheers,

Dave


Monday, October 2, 2017

Video tutorial: Scale Model Basics - How to stretch sprue for antennas and rigging

I thought it might be useful to share some really basic, fundamental model making skills - how to stretch sprue to make scale antennas, aerials, rigging for biplanes or rigging for ships and naval vessels. I was worried that it was too fundamental, too basic, but the reception it has received so far on YouTube is pretty positive and it seems that some modellers out there are open to getting a better understanding of the fundamentals.


Stretching sprue - it doesn't get much more fundamental! Best of all - it's free.

how to stretch sprue for plastic scale models


It's one of the very first "non-box" modifications that most modellers make, one of the first added details that doesn't come with a piece in the kit.

My video shows you how to stretch sprue easily and consistently. Good luck, and enjoy!

stretched sprue for plastic scale models
This is literally five minutes work.

Video is embedded below, but in case that doesn't work, here is the link:
Scale Model Basics: How to stretch sprue for antennas and rigging.

Cheers,

Dave