Tuesday, May 30, 2017

Airbrushing outside in 8°C (46°F)


Soooooo, I had a quick bit of airbrushing I wanted to do. A single section, a single colour. One of those bottleneck bits that you have to paint before you can move on to other bits of construction. But I only airbrush outside, it is the start of Winter here in Australia, and when I get home at 5pm it is already getting dark. Rather than wait for the weekend, when I could airbrush during daylight, I thought I would do a quick, easy airbrushing session outside at 9:30pm to progress past this bottleneck.


Sitting in my centrally-heated house at my comfortable workbench, I masked off the section I wanted to paint.

Not the most complicated masking, I'll grant you.


Then I went outside.

"A bit chilly, but it's an easy, quick job", I thought.

Those fingers are red and numb.


Let me tell you, after 3 or 4 minutes, that metal airbrush is goddamn COLD to hold onto.

Twenty minutes later, my fingers are still aching.

Well, yeah, in hindsight it's easy to look up the temperature outside, sure...


There's a lesson in there somewhere...

Something about it's stupid to airbrush in the dark where you can't really gauge what you're doing with any colour modulation?

Something about checking to see how cold it is before you begin?

Something about paint might not act the same in such a cold atmosphere?

 Something about buy an indoor paint booth?

Something about being more patient?

.....

Pffft, nah. And tomorrow when my fingers are working properly again I can stick on the windshield - huzzah! Take that, bottleneck!

Dave


Friday, May 26, 2017

Working out how to add detail to the Mustang's drop tanks

Today I had a spare few minutes, and worked out how I was going to add scratch built detail to the Mustang's drop tanks.


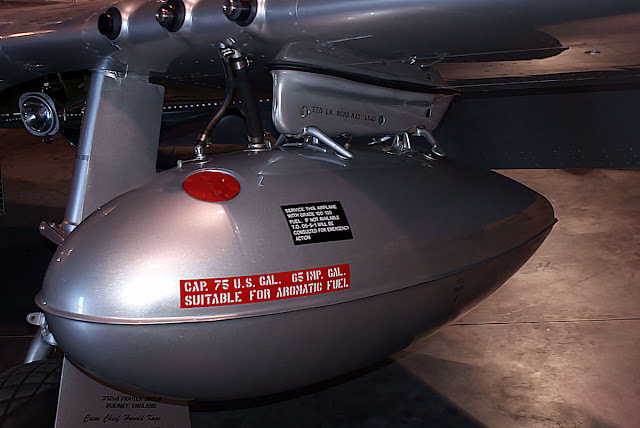
P-51D Mustang drop tank
This is what it's all meant to replicate.

A plan is not essential - in fact, I particularly love just ferreting through piles of spare bits and bobs when I'm scratch building looking for the perfect piece to solve my puzzle.

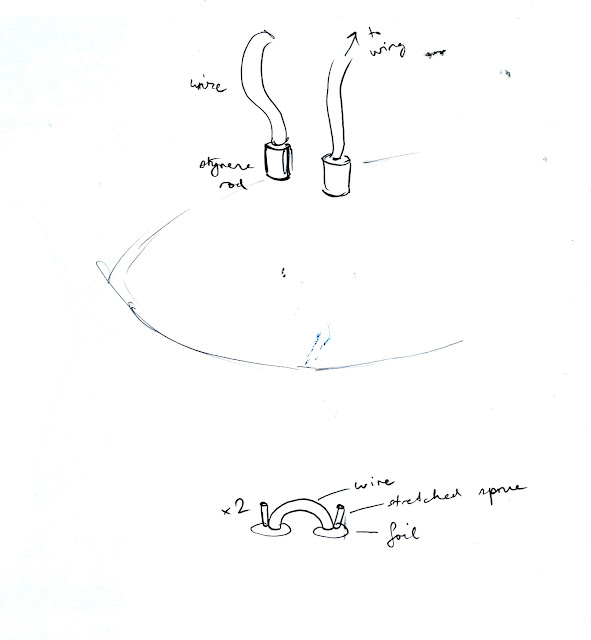
But it's is good to have a rough plan of what you're trying to achieve and just how you'll do that. And so, I present to you my masterpiece:


P-51D Mustang drop tank
This is the plan.

P-51D Mustang drop tank
It's good to use a pencil and get away from a computer!


This all seems pretty straightforward, a great way to add detail to the original, and rather basic, kit. The trickiest bit I foresee will be trying to cut nice, symmetrical circles out of foil with a scalpel. Makes me wish I had a rivet punching tool.

Have a great weekend,

Dave


Thursday, May 25, 2017

Early research for a new kit

While I have a self-imposed rule of only building one kit at a time (it just gets too messy otherwise, both on my workbench and in the plans in my head) I do allow myself to start researching the next project. So while I'm only about 60% through my 1/32 P-51D Mustang build, I'm itching to start the 1/35 Tamiya Panther G Late Version which I bought recently.


This little beauty.


I'm sure there are hardcore armour modellers out there who only consult expensive hard cover books with titles like "Panzer Tracts No. 5-1 = Panzerkampfwagen 'Panther' Ausf.D with Versuchs-Serie Panther, Fgst.Nr.V2" (yes, that is a real book title), and if that floats your boat and you have the library on your bookshelves already, power to you brother.  I don't tend to invest in that sort of reference material, for two reasons:


  1. I rarely make multiple models of the same vehicle over and over, so an expensive book on Panthers will only get used once this decade
  2. Why would you when the interwebs is such an immense storehouse of amazing?


I get it if you want to model one particular tank at one particular battle, you need that sort of in-depth stuff. I totally get that. I tend to model a representative look, a slightly more "looks like feels like" kind of modelling where I concentrate on telling a story. I know that is verboten among some modellers, but screw it, it's a hobby rather than work: at work my creative output is reworked and endlessly discussed in a design-by-committee process (with all the soul crushing that entails), whereas when I'm modelling the only person I am answerable to is me - that's why I do it.

Instead, a good old Google Images search will usually bring up exactly what you want to see (for example, the close-up views of Mustang wheel wells that I've found have been invaluable for adding scratchbuilt detail to my current build).

I also find Pinterest an amazing reference for model inspiration. I've mentioned before what a good resource Pinterest is and my Top 10 Pinterest boards, and I'm going to spruik it again today.

I'm looking for inspiration for my Panther. I don't have a set story or idea in mind yet, although I really do like the two figures watching the sky which come standard with the Tamiya kit.  Will it be a winter setting or summer? Eastern front or Western front? I don't know.

What I do know is I want to model this Panther as a dirty, dirty kitty.

No, not like that...

I want it to look weather-beaten and oil stained and muddy and dark. I know that my models tend to be a little bright, the colours don't tend to be washed out - that just appeals to me and looks good to my eye. Totally subjective, and I like it.

But for this model, I want to push my own boundaries and get out of my comfort zone. I want it to be dark and stained and not-at-all-bright. Like this:

Dirty. So dirty.  Source.

Source.

Source.


I also want to try my hand at faded paintwork. My normal go-to technique is the salt method for modulating paintwork colour, but for this one I want that really faded, washed out paint look. Like this:

Yes, I know that is not a Panther G, but just look at that amazing faded paint!  Source.
Source.


And then you also find amazing thought-starters like this. This is the best-modelled non-penetration I've ever seen on a scale model tank:

That. Is. Amazing.   Source.


All of these early references are from Pinterest. I love it.

As the build progresses and I need more in-depth reference images for particular bits of detail work, then it'll be back to Google Images. But for now, these sorts of shots by fellow modellers are enough to spark my imagination and get me thinking about the story I'm going to tell.

Strap yourself in for the ride.

Cheers,

Dave


P.S. I don't own the copyright to any of these images. If you are the brilliant modeller who built any of these, and would like to be acknowledged as such, please get in touch. I especially want to hear from whatever freak drew Hello Kitty like that...

Tuesday, May 23, 2017

A little weathering goes a long way...

I couldn't resist sharing a little sneak peek of how the painting of the Mustang's wheel well is coming along.


A little wash with Vandyke Brown oils here... A little drybrushing of highlights there...


From a kit-standard wheel well...
... to this...


... and then to this with a little careful weathering.
Still lots to do, but jeez I love what a little painting detail can do.

Cheers,

Dave


Monday, May 22, 2017

A clever bit of kit engineering by Hasegawa

So I'm building my 1/32 Hasegawa P-51D Mustang over the weekend. This is originally a 1960s kit, and it has a lot of shortcomings. I'm up to the landing gear. I snip off the wheels, and then I notice something spectacular...


Those wheel halves are incredible. Trust me.


The finished wheels.


Just watch the video below. I will admit, I had had a martini before I recorded this, which perhaps explains why I was just so exuberant, but the fact remains this is a beautiful little bit of 1960s scale model kit engineering that current manufacturers could learn from.

Video link: Clever scale model kit engineering by Hasegawa
or click the video below:


Cheers,

Dave


Saturday, May 20, 2017

A mystery about the colour of a de Havilland Vampire jet on a pole

I live in the inner west of Melbourne. Fairly near my house is a shopping centre which used to be the Royal Australian Air Force Tottenham Store during the Second World War. As a nod to that history, they have an old de Havilland Vampire jet mounted on a pole at the entry to the carpark.


I tried to get some okay shots of it today, but they're not great.

Here's another shot I found online:

Source.

And here is a shot of it from when it was in operational service:

Source.

As you can see, when it was operational it was uncamouflaged, unpainted aluminium.

What I can't understand is when I look at it today: is this raw, weathered aluminium, or is did they misguidedly paint it grey before they plonked it on top of a pole?


I think it must be aluminium, and it is just weathered and sun-beaten until it is this dull, greyish tone.

Would that be right?

Any input is welcome.

Cheers,

Dave


Friday, May 19, 2017

Another inspiring weathering reference: Or, Yet More Rusty Junk


I've posted in the past about looking for weathering references when you are out and about in everyday life. I've found another one that I just have to share.


When I'm anywhere even remotely not in the middle of the city, I send my partner crazy by randomly and suddenly stopping the car to take photos of rusty, old machinery. I absolutely love this stuff, just left to gently rot away in a corner of a paddock. I call it an "abandoned industria aesthetic". My partner calls it "we've stopped again to take photos of tetanus junk".

(If I'm being honest: I would take photos of this kind of abandoned machinery even if I didn't have the excuse of wanting to stash it in my "weathering references" file.)

Last weekend we visited Bacchus Marsh, a town about 50km west of Melbourne. While we were there, I spotted this little trailer in a council depot next to a park.


Rusty metal reference for weathering scale models


Rusty metal reference for weathering scale models


Yes, it's perhaps a little too weathered to be used on any kind of military vehicle that is meant to be portrayed as still in service.  But for an abandoned truck, those big ol' wheels are juuust right.

The tone of green on the body paintwork is also great: it's been bleached in decades of sunlight. Faded and rusty. Love it.


Rusty metal reference for weathering scale models


Rusty metal reference for weathering scale models
Man, I love these wheels.

The colour of the faded rubber tyres is also something I'm going to try to replicate on my next armour or soft-skinned vehicle. The lightness closer to the rim is very interesting.

There's nothing earth-shattering in this post: just another example of using the real world to improve your scale models.  Now, where did I stash that crappy old Italeri Opel Blitz kit???

Until next time.

Cheers,

Dave

Wednesday, May 17, 2017

Detailing the P-51D Mustang's wheel well is done

I've been furiously sticking bits and bobs into the wheel well of my Hasegawa 1/32 P-51D Mustang, in order to try and up the detail there. It is sadly lacking in the kit-standard form - it's a bit dire down there.


So I've been looking up references online, and trying to replicate a rough representation of the real-world confusion of pipes, bends, wires and equipment.

Here's what the kit looks like without any additions:

1/32 Hasegawa P-51D Mustang scale model wheel wells


As you can see, there's not a lot happening in those Hasegawa wheel wells.


Here's what a real Mustang's wheel bay looks like:

Real P-51D Mustang wheel well
There is a LOT of stuff in there!  Source.


And here is where I'm currently at:

1/32 Hasegawa P-51D Mustang scale model wheel wells

1/32 Hasegawa P-51D Mustang scale model wheel wells


I still need to make two of those piston thingees that lower the flaps, and I still need to scratch build a landing light, but I am going to leave these off until the landing gear is installed in place, otherwise I can just see myself breaking them repeatedly during construction and painting.

It's tough to make both sides look fairly organised and mirror-images of each other. My style of scratch building detail can be best summed up as "Aaargh, close enough, it's a looks-like feels-like sorta vibe", and that doesn't readily lend itself to precise replication on both wheel wells! ;)

Until next time.

Cheers,

Dave


Tuesday, May 16, 2017

Video tutorial: How to make rivets on a scale model - scratch build at no cost

My latest video tutorial shows you how to make rivets on any scale model surface, at absolutely no cost. (Well, maybe it will cost you about 1 cent's worth of materials that you already will have in your model-making toolbox.)  It's a versatile and dead-easy technique.


Youtube tutorial: how to make rivets on a scale model


The secret ingredient is....... plain old PVA white glue.

This is an old trick, I first read about it back in the 1980s in a fairly average modelling book. You know the type, you see them all the time in secondhand book stores, a 1970s black and white photography "The Model Maker's Handbook Compendium" type of thing. I remember the rest of the book was pretty dire, but this technique stuck with me. And it works a treat.

It's perfect for adding texture to otherwise boring surfaces, or for detailing a section of airframe or armour plate which should have rivets and doesn't.

This technique works best for larger scales: 1/24, 1/32 or 1/35. I wouldn't recommend it for 1/48 or smaller, simply because it is hard to get the rivets small enough.

With a little practice you can make very realistic rivets. I suggest doing a trial run first on some scrap styrene just to get a feel for it, before you start glooping PVA glue all over your latest pride and joy, but it is most definitely an easy technique.

  It ticks all of my boxes:
  1.  Effective
  2.  Cheap
  3.  Easy
  4.  Flexible
So have a look, and give it a try.


Here's the video link: How to make rivets on a scale model - scratch build at no cost.
or you can click on the embedded video below.

Cheers,

Dave


Monday, May 15, 2017

Guest post by Ian Gittins: Building a "Paper Panzer"

Today I have a post written by a special guest blogger, my friend Ian Gittins. Ian is a lifelong modeller who specialises in 1/35 armour builds. He's just finished building a Dragon VK.45.02(P)H tank, and has shared his experiences:


____________________________

1/35 Dragon VK.45.02(P)H


"Ok, like Dave I prefer a simple approach to building kits and try not to get to bogged down with detail or agonise over historical accuracy . Kit building is supposed to be an enjoyable experience and give you the opportunity to be creative and use your imagination. So, my approach to a potential build is:

  1.  It has to be a cheap(ish) but decent brand of kit 
  2.  It doesn't contain a million parts
  3.  It won't take me months to build, and
  4. Only a quick bit of internet research on references is required.


So, the kit I've just about completed is a 1/35 Dragon VK.45.02(P)H (Kit #6657) which I'd purchased from Hobby HQ in Thomastown  for $38 (THE best model shop ever!). I've a real hankering for the more unusual WW2 German tanks which are often referred to as "Paper Panzers" as they never really came into production.

1/35 Dragon VK.45.02(P)H (Kit #6657)


The kit has nice crisp moulding and fitted together well bar the photo etch cable guides on the sides as they came off at any given opportunity due to the poor design and fragility of the metal. I gave up re-attaching them after a while as they drove me mental. The instructions are also missing a section about constructing the gun so I had to use my brain a bit to figure it out and the other bone of contention was the metal barrel. The barrel was too heavy and would drop onto the body of the tank so ended up super glueing all the inside parts of the breach to keep it in place.

The one piece tracks are really good and there was no real issues fitting them. For this kit I wanted to try some different painting methods so I attached all the tools before painting which is something I don't usually do. I used leftover tools from a Trumpeter kit I'd built previously and cleaned out the clasps with a pin vice as the Dragon moulded tools where a bit bland and I'm never going to attempt putting photo etched clamps on any kit as I have hands the size of bear paws and eyes like a deep sea fish!

Now this is where the real agony begins ....Primers ! I used AK Interactives red primer for the first and most likely last time.... I HATE AIRBRUSHED PRIMERS as my Tamyia 0.3 Airbrush just can't handle them regardless of what thinner I use. I even tried Windex and it failed. I tried a cheap airbrush with a 0.5 needle and that failed too, so Tamiya spray can primer is the way fwd either that or $6 Car Primer from Super Cheap Auto.

Anyway, after the primer saga I then added a base coat of Tamiya XF 84 Dark Iron which makes a great and realistic base metal colour. After the dark iron I applied a layer or two of hairspray then a thin layer of Tamiya XF64 Red Brown mixed with some flat red and chipped it off after about 45 mins drying time.Applied a quick layer of Tamiya Semi Gloss clear to seal it in then after 24 hrs drying time another two layers of hairspray. Next a base coat of Tamiya DK Yellow (lightened with some Tamiya Buff).

I then spent nearly two hours masking off areas to do a real fancy splinter camo scheme using professional (and expensive) masking tape and applied AK's Chocolate Brown and an AK something or other green. Peeled away the tape and WHAM the paint came off in large chunks right down to the plastic and the tape bled too which really sent me into a frenzy and out into the garden armed with Easy Off oven cleaner to strip it all off at 10pm !

Started again but this time used a Mr Hobby Russian Green for the camouflage (gave up on the splinter camo for now). The green came out a bit to garish but what the hell..... Weathered it with some cheap oil paint from Reject Shop ($5 for pack of 10), Vallejo pigments, sponge chipping, AK Streaking/Rust effects stuff.

1/35 Dragon VK.45.02(P)H (Kit #6657)
That is some damn fine chipping right there - Dave

So the moral of the story is....AK and Vallejo may be forgiven some ways as the make excellent weathering products but they are to be burned at the stake for their airbrush paints and primers. Professional $12 a roll masking tape is also to be avoided at all cost.

A lot of mistakes occurred whilst building this kit and it took forever to finish  but it certainly pointed out some pit falls along the way and I've learned a little bit more on what works, what doesn't and what I need to avoid in the future."

1/35 Dragon VK.45.02(P)H (Kit #6657)
The finished product.

1/35 Dragon VK.45.02(P)H (Kit #6657)
Scratch built hinge on the ladder.

____________________________

Thanks for the write-up Ian.  I feel your pain, there is nothing like peeling the masking tape off a carefully painted work of art to find a nasty surprise underneath...

I'm never going to be able to airbrush AK Interactive paint again without thinking of you shaking a fist at them and threatening to burn them at the stake :)

These so called "Paper Panzer" late-war prototypes are just fascinating. You can really see the development of armour philosophy in the closing stages of the war: bigger guns, better crew protection(gotta love that turret protected way at the back of the chassis, quite like the design of the later Israeli Merkava tank), attempts at increased mobility.

From Wikipedia:
"The VK 45.02 (P) was the official designation for an unsuccessful heavy tank project produced by Porsche in Nazi Germany during World War II.

Development of this vehicle started in April 1942. The Krupp company received an order for construction of turrets. However, the prototype hull was never manufactured. The turrets were mounted on the first Tiger IIs.

After the VK 4501 (P) failed to win the contract, Dr. Porsche began looking at ways to improve the design for a future version. Based on the latest Allied tank designs, however, it was clear that simply increasing the armor on the VK 4501 (P) would not be enough for the tank to remain competitive. It needed to have both more weight and more maneuverability. What initially began as a single vehicle, entitled "Typ 180" grew into a series of five different vehicles, requiring the development of two hull configurations: the Hinten with its turret at the back (as shown in the picture on top) and the Vorne with its turret on the front. Both an electric and a hydraulic drive system, and four different engines. The overall project came to be known as VK 45.02 (P)."

Source: Wikipedia.


Fascinating. And now I have another genre of models that I want to build.. thanks a bunch Ian! ;)

I hope you enjoyed having a guest blogger contribute. Please do leave comments below if you have any feedback, and do please get in touch with me if you are interested in contributing something of your own, I'd love to hear from you.

Until next time,

Cheers,

Dave


Friday, May 12, 2017

Shizuoka Hobby Show - new 2017 model kit releases

You may not have heard of the Shizuoka Hobby Show, but it is massive. It's held annually in Shizuoka, Japan (the city where most of Japan's model kit industry is based, the headquarters of Tamiya and Hasegawa are there among others) and it is where a lot of the most exciting new releases for the coming year are announced. And it's on right now... this weekend... I'm excited.


Shizuoka Hobby Show 2017
Source.


Part of the reason I am excited about this is that I will be visiting Shizuoka in December, and I'm going to visit the Tamiya showroom (so much history!). I will admit it, I am a massive fan of Tamiya.

Another part of why I'm so excited is that new kits are being announced left and right. I'll restrict myself to what I am interested in, so here are the highlights of the 1/35 scale military releases and 1/32 aircraft releases.


1/35 Military models


Fine Molds - Japanese type 3 Medium Tank Chi-Nu

Who doesn't love some Japanese armour? Apparently the tracks have decent sag moulded into them. Nice, interesting subject.

Fine Molds 1/35 Type 3 Chi-Nu tank scale model new release 2017
Source.


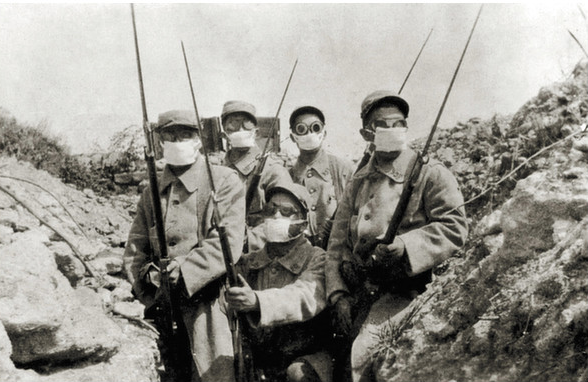
ICM - French infantry in gas masks 1918

An interesting addition to all the cool 1/35 stuff that has been released in the last five years. The centenary of WWI has really brought about a long, long-overdue renaissance of WWI subjects in modelling.

ICM 1/35 French infantry in gas masks scale model new release 2017
Source.


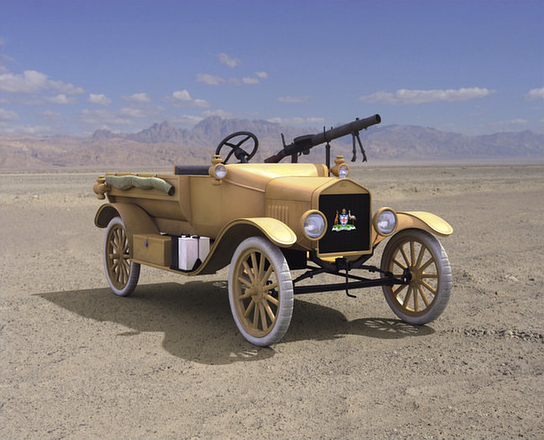
ICM - WWI Australian Army Model T

Another unusual WWI subject. It's not quite my cup of tea, but I'm Australian, so I had to include this in my list.  You have to love that Australian coat of arms on the radiator, though.

ICM Australian Army Model T scale model new release 2017
Nice Lewis gun too.  Source.


Revell - Stug IV

Meh. Another Stug. There would have to be something pretty damn special about this release from Revell to excite me, and I can't see what that is...


1/35 Revell Stug new release 2017
Source.


Meng - Cartoon tanks (yes, I know, these aren't 1/35 scale...)

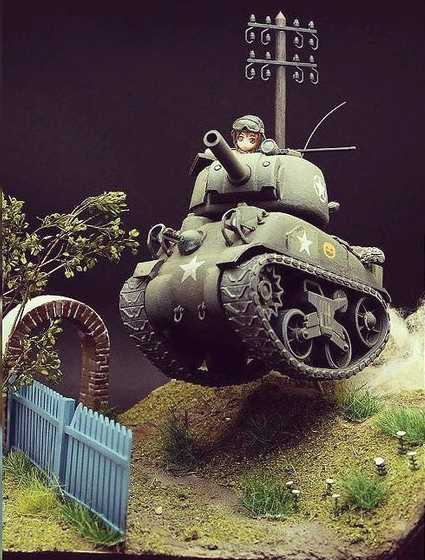
The cute little Sherman and Tiger I which were released by Meng recently are now joined by a King Tiger (Porsche Turret) and a Soviet KV-2. I'm torn about these. Yeah, they're cute and clever, and I have seen one cool diorama done with the Sherman (see bottom of this post), but I don't quite get why you would spend your time on these?  Great for indoctrinating introducing kids to the hobby though.

Meng King Tiger scale model cute egg tank new release 2017

Meng KV-2 new release 2017
Source.


1/32 Aircraft


The only one I can see of merit released at this stage is a new Wing Nut Wings release, although I had been hearing rumours on social media of a revised Tamiya Corsair for the last month or so.


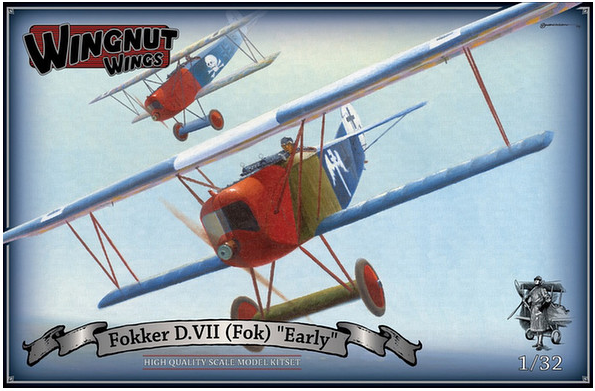
Wing Nut Wings - Fokker D.VII "Early"

Man, I really needs to get me a Wing Nut Wings kit to see what all the fuss is about. Everything I've heard about them says they are a joy to build. All I know is: a) they are ruinously expensive, and; b) they clean up awards in the model shows I've been to! This new release is a good looking machine.

1/32 Wing Nut Wings Fokker D.VII Early new release 2017
Source.


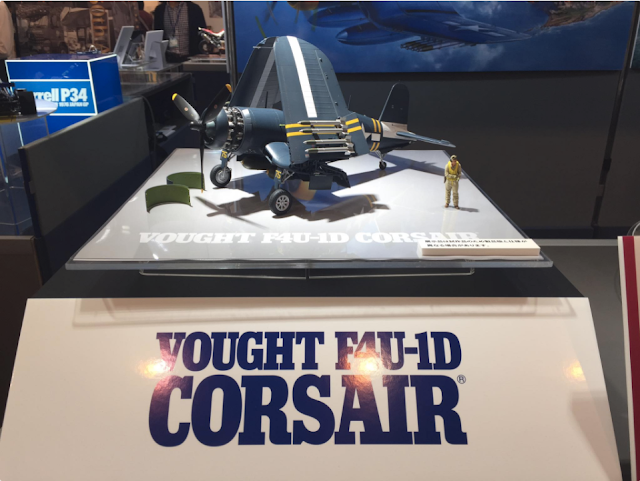
Tamiya - Vought F4U-1D Corsair

This is a re-tooling of the F4U-1 Corsair that Tamiya released a couple of years back. I dunno, it's a plane I've never loved the look of. If I haven't bought their first 1/32 Corsair by now, I can't get excited by this re-worked version. Sorry, Tamiya, I was hoping for a big, game-changing entirely new release like your Mosquito was. But that's just me, maybe some obsessive out there wants to build every variant of the Corsair in 1/32 scale?  C'est la vie.

1/32 Tamiya Corsair Vought F4U-1D new release 2017
Source.


So there you have it. I wish I was in Shinzuoka this weekend! But December will have to do.

Chime in with comments below if you think I've been too harsh on any of these new releases!

Cheers,

Dave


Bonus content:

I promised you I had seen one really well done Meng cute egg tank diorama done. Here it is, sourced from Instagram. It has an amazing sense of motion, it's fun, and definitely skillfull. I tip my hat to this unknown modeller!

Meng egg tank cute Sherman diorama
Source.


Wednesday, May 10, 2017

Video tutorial: How to paint realistic gunmetal

Gunmetal can be a tricky effect on scale models. If you just slather on gunmetal paint, it is nothing special. In this video I show you a basic painting technique which is a great way to attain a much more nuanced, realistic gunmetal effect.


Youtube tutorial: How to paint gunmetal on scale mode planes, tanks and military figures


It's nothing groundbreaking: this is a Basic Scale Modelling 101 tip.  Most modellers will already know this, it is an old technique that I think came out of wargaming painting back in the 1990s. But if you haven't encountered it before, you'll love it.

What I love about this is it is very versatile, across every scale it will work for tanks, aircraft, military figures, you name it. It can also be used for other metallic tones: gold, silver, aluminium, bronze, copper, iron engine blocks, brass bullets, whatever.

So have a look at the video below and let me know your thoughts.

Cheers,

Dave