Friday, September 30, 2016

Starting painting the Tamiya 1/35 Soviet SU-122 tank

And so it begins!  I have painted the first base layer of rust colour for the SU-122 tank, using AK Interactive Rust acrylics.

A link to this product is below the photos. Check it out.

It's going to be one ugly, beaten-up war machine by the time I'm finished.

Cheers,

Dave

SU-122 Tamiya 1/35 model kit
That's an ugly shade of brown.


SU-122 model tank - first layer of rust painted
It's going to be the base of a whole lot of shades of rust.

Thursday, September 29, 2016

Painting of 1/35 Soviet tank crew figure is complete

So I have completed the 1/35 Soviet tanker who will be mounted in the SU-122 assault gun tank once it is finished.

I've mocked up a rough placement of him below.

I didn't spend a lot of time or energy on his trousers or boots, as these will be 99% invisible once he is in position.

Just needs a coat of matt varnish airbrushed on to get rid of some unwanted highlights on his tunic and he is done.

I hope you like him.

Cheers,

Dave

Soviet 1/35 tank crew for SU-122

Soviet 1/35 tank crew for SU-122

Wednesday, September 28, 2016

Video tutorial: How to paint 1/35 leather belts using oil paints

Welcome to another video tutorial. This time I’m showing you how to paint leather in 1/35 scale, using oil paints.  This can be used for leather belts, leather holsters, leather satchels, leather helmets, leather coats and all other sorts of stuff you would encounter when modelling  1/35 military figures.

My subject today is the Soviet tank crew member who came with my Tamiya SU-122 self propelled assault gun kit. It’s a basic old 1980s figure, it doesn’t have the beautiful moulding you would expect from a modern kit (let alone one of the fancy-pants expensive resin figures available now). But it does fit the kit perfectly, most importantly around the raised hatch and his arm rests perfectly on top of the tank.  Plus I like to challenge myself and see just what I can do with older models.

Using oil paints isn’t intimidating. When I first started I thought oil paints were only for artists, that drying times would be a nightmare, that paints and thinners and drying mediums would be expensive – all that sort of stuff.  Nope. You can pick up oil paints cheap at your local dollar store, and the cheap tubes will do the job just fine.  Slower drying time is actually your friend when it comes to painting leather, you want to be able to blend the colours and get nice gradations of tone. I don’t use any fancy materials like specialised thinners, I just use the normal stuff I use with enamel paints.

The oil paints I used to achieve a nice, rich brown leather colour were as follows:
1. Base of Vandyke Brown
2. A light wash with Lamp Black to increase shadows
3. Blend in Burnt Sienna for gradients
4. Highlight with Yellow Ochre, but be restrained here! If you don't like it, wipe it off. Remember, slow drying is your friend here.
5. A final little touch up with Vandyke Brown again to bring out details.


So give it a try. It’s a lot like painting with enamels, but you have more working time and you can really blend the colours like a pro.  Explore, experiment, enjoy!

Video link: How to paint 1/35 leather belts using oil paints

Cheers,

Dave

Leather belt and holster painted on Soviet tank crew
Leather tank crew helmet and leather holster.


Leather belt and holster painted on Soviet tank crew
Leather belt and shoulder belt.


Monday, September 26, 2016

Painting a 1/35 Soviet tank crew figure

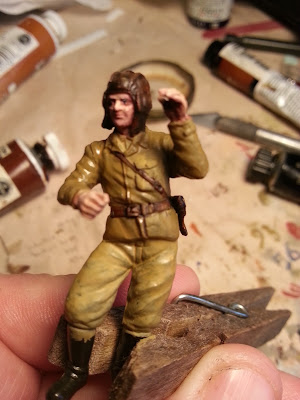
Tonight I'm painting a 1/35 Soviet tank crew figure.  It is the bog standard figure which came with the Tamiya SU-122 Russian Assault Gun I am working on at the moment (Tamiya model 35093).

Circa 1987, it's nothing much compared to modern resin figures, but it works perfectly with the raised hatch on the tank, and with some careful painting I think I can make a purse out of a sow's ear.

More progress pics to come.

Cheers,

Dave

1/35 Soviet tank crew man.

Sunday, September 25, 2016

You know it's been a good model making day when...

You know it's been a good model making day when:

1.Your fingers are splattered with paint that won't wash off;

2. There is dried superglue feeling freaky on your skin from where you almost superglued your fingertips together, and;

3. You have a little scrap of tissue superglued to your finger.


The only thing missing is some kind of scalpel wound.

Yep, a good day's modelling :)

Cheers,

Dave

Up close and personal: Paint splatters and superglue.


Saturday, September 24, 2016

Video tutorial: how to make a cast metal texture on plastic models

Hello all,

My latest video is a tutorial on how to simulate a cast metal texture on plastic models.  Many tanks such as the Soviet T-34 or the American Sherman had sections of armor that were made of cast metel, rather than rolled sheet metal. Usually it was for gun mantlets or tank turrets, areas that needed to be curved which plates of metal couldn't do.

Many modern scale model kits do a good job of simulating this distinctive cast metal texture in 1/35 scale - Dragon, Meng, modern Tamiya kits all do this well. But a lot of older kits do an abysmal job, or don't even try.

Replicating a cast metal texture in scale is quite easy, and it really does add something to your model.  I use Mr Surfacer 500, available from any hobby shop or easily found online.

There are other methods, such as using glue to partially melt the surface, but I have found these a bit tricky and unpredictable, and it is a rather anxious process to see your carefully built model looking gloopy and partially melted!  Mr Surfacer is sure fire - you literally cannot mess it up as long as you keep the texture to the correct area and don't "colour outside the lines".  And it only takes about 15 minutes.

Good luck, and enjoy experimenting!

Dave

Video link: How to make a realistic cast metal texture on your models with Mr Surfacer 500

Cast metal texture on this big, ugly Soviet gun mantlet, using Mr Surfacer 500.
Man, the Soviets built some ugly, utilitarian tanks in WWII...

Friday, September 23, 2016

Video tutorial: Beginner's guide on how to use photoetch metal on models

I've uploaded another video tutorial. This time it is about how to use photo etched metal detail to upgrade your models.

It's a bit of a leap of faith the first time you use photo etch. It's expensive to purchase, and it's daunting to look at the cryptic instructions and think "how the hell am I supposed to bend that into that shape?"

This video is aimed at the beginner who has questions on how to begin using photo etch.

As always, if you have any questions, suggestions or feedback, please contact me. I'm all ears.

Cheers,

Dave

Video link: Beginner's guide on how to use photoetch metal on models.

The end result: photo etched metal grills on my SU-122. I'll show you how to do this in my video tutorial.

Wednesday, September 21, 2016

Video tutorial: how to use plaster of Paris to build ground in a diorama

I've uploaded another video tutorial.  This time I show you how to use plaster of Paris to form the ground on a diorama.

I have already build up the height I need using polystyrene cut to size. The plaster adds texture and contours to the diorama base, and makes a convincing ground surface to work with.

Part II of this video will concentrate on then detailing up the plaster surface with rocks, debris, sand, , grass and shrubs and the like.

Enjoy!

Cheers,

Dave

Click here: Video link: How to use plaster of Paris for the ground in a diorama


Plaster of Paris is poured on top of shaped polystyrene in my Tunisian Tiger diorama
That donkey better get out of the way of that Tiger...

Tuesday, September 20, 2016

Photos of my modelling workshop and model display area

I thought you might like to see some photos of where I make and display my models.

I do all my building here, apart from airbrushing, which I do on the back porch.

It proves that you don't need a huge amount of space to build models,you just need to be organised and have a good light source.  That said, my workshop could do with a bit of a tidy and a bit of a refresh. Perhaps that can be a project for this weekend.

You can also see part of my collection of military headgear, including the famous German pickelhaube spiked helmets from WWI.

I will have more photos of my collection of built models and dioramas at a later date. Stay tuned.

The work bench.

Bookshelves and model display.

1/32 aircraft models. From top: Dewonite, Zero, Hurricane, Stuka.

More 1/32 aircraft models.

Some 54mm WWI figures.

Saturday, September 17, 2016

Video tutorial - how to model realistic dents in plastic scale models using heat

I've just uploaded a video to youtube on how to model realistic looking dents in plastic models. Usually this will be for fenders on cars or 1/35 tanks.

If you've ever tried to dent a model and had your model melt and blob into something horrible, my technique will save you from ever again watching your project curl up and die.

Check it out!

https://youtu.be/mvE6tTWxXZM

This is a SU-122 kit, the fenders have been dented

Cheers,

Dave

Welcome to Dave's Model Workshop

Welcome to Dave's Model Workshop. I've set up this blog to share my hints, tips and techniques for making better plastic models.

I hope that this blog will help you elevate your plastic scale model making. If you're currently happy with your models, but you feel there is room for improvement, this is for you.  If you feel like your models are currently say a 5 out of 10, then the hints and techniques I will share with you will get you to an 8 out of 10. I'm not a Master Model Maker - we've all seen those masterpieces which make you say, "Wow, how did he do that?" I do not clean up at local model show awards (partly because I'm not an obsessive rivet-counter!) but I make models which I find pleasure in, and I have seen my models improve over the years with new ideas and better ways of achieving the results I want.  I love them, I love this hobby we share, and I love to learn new techniques and share them with others.

I mostly build 1/35 WW2 armor - tanks, staff cars, armored cars, etc.

I love to build 1/35 dioramas - I think a tank by itself on a plinth looks out of place, and it doesn't tell a full story. I'm currently in the middle of making a diorama set in North Africa, with a Tunisan Tiger I tank.

I also build 1/32 WW2 warplanes - classic single seat fighters such as the Spitfire, Hawker Hurricane, Fw190, Mitsubishi Zero, but also some more unusual stuff like French Dewonite fighters and Stukas.

So check back regularly. There will be videos, photo tutorials, social media posts and I will share whatever amazing scale models I come across.  I will also be posting on Facebook, and regularly uploading new videos on Youtube. Please do subscribe, and I'd love to hear from you if you have any comments, questions or suggestions.

Cheers,

Dave