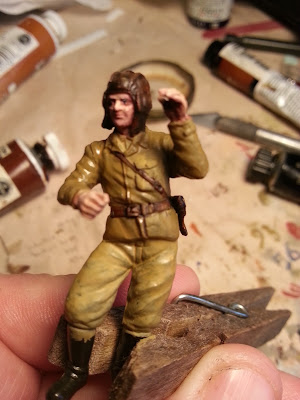
Welcome to another video tutorial. This time I’m showing you
how to paint leather in 1/35 scale, using oil paints. This can be used for leather belts, leather
holsters, leather satchels, leather helmets, leather coats and all other sorts
of stuff you would encounter when modelling 1/35 military figures.
My subject today is the Soviet tank crew member who came with my Tamiya SU-122 self
propelled assault gun kit. It’s a basic old 1980s figure, it doesn’t have the
beautiful moulding you would expect from a modern kit (let alone one of the
fancy-pants expensive resin figures available now). But it does fit the kit
perfectly, most importantly around the raised hatch and his arm rests perfectly
on top of the tank. Plus I like to
challenge myself and see just what I can do with older models.
Using oil paints isn’t intimidating. When I first started I thought
oil paints were only for artists, that drying times would be a nightmare, that
paints and thinners and drying mediums would be expensive – all that sort of
stuff. Nope. You can pick up oil paints
cheap at your local dollar store, and the cheap tubes will do the job just fine. Slower drying time is actually your friend
when it comes to painting leather, you want to be able to blend the colours and
get nice gradations of tone. I don’t use any fancy materials like specialised thinners, I
just use the normal stuff I use with enamel paints.
The oil paints I used to achieve a nice, rich brown leather colour were as follows:
The oil paints I used to achieve a nice, rich brown leather colour were as follows:
1. Base of Vandyke Brown
2. A light wash with Lamp Black to increase shadows
3. Blend in Burnt Sienna for gradients
4. Highlight with Yellow Ochre, but be restrained here! If you don't like it, wipe it off. Remember, slow drying is your friend here.
5. A final little touch up with Vandyke Brown again to bring out details.
2. A light wash with Lamp Black to increase shadows
3. Blend in Burnt Sienna for gradients
4. Highlight with Yellow Ochre, but be restrained here! If you don't like it, wipe it off. Remember, slow drying is your friend here.
5. A final little touch up with Vandyke Brown again to bring out details.
So give it a try. It’s a lot like painting with enamels, but
you have more working time and you can really blend the colours like a
pro. Explore, experiment, enjoy!
Video link:
Video link:
Cheers,
Dave
 |
| Leather tank crew helmet and leather holster. |
 |
| Leather belt and shoulder belt. |

Thanks so much for sharing this awesome info! I am looking forward to see more postsby you! 1911 leather holsters
ReplyDelete